“Adorable Baby Boy: Mixed Media Layout” by Priyanka Singh, Feat. Munchkin Paper Collection

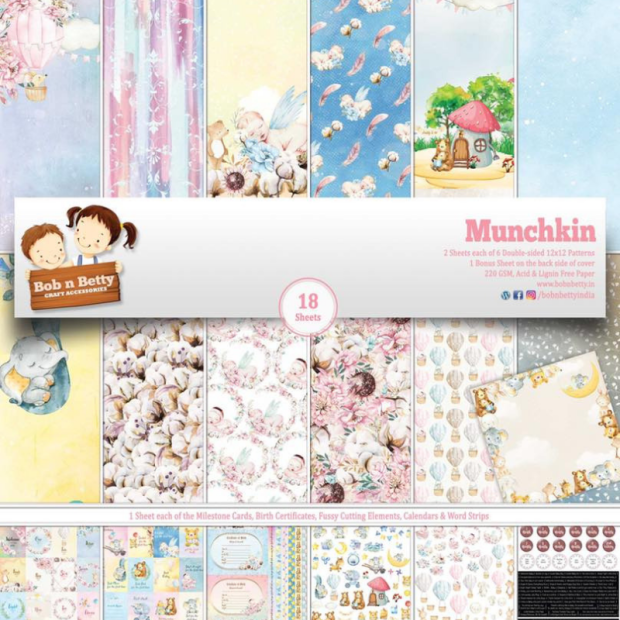
Here I am with my very first inspiration for you all! The wonderful munchkin paper collection with such gorgeous prints made me very excited to do a mixed media scrapbook layout using the paper. It’s not just the scrapbooking u can do with the papers but can surely try out making gorgeous layouts.

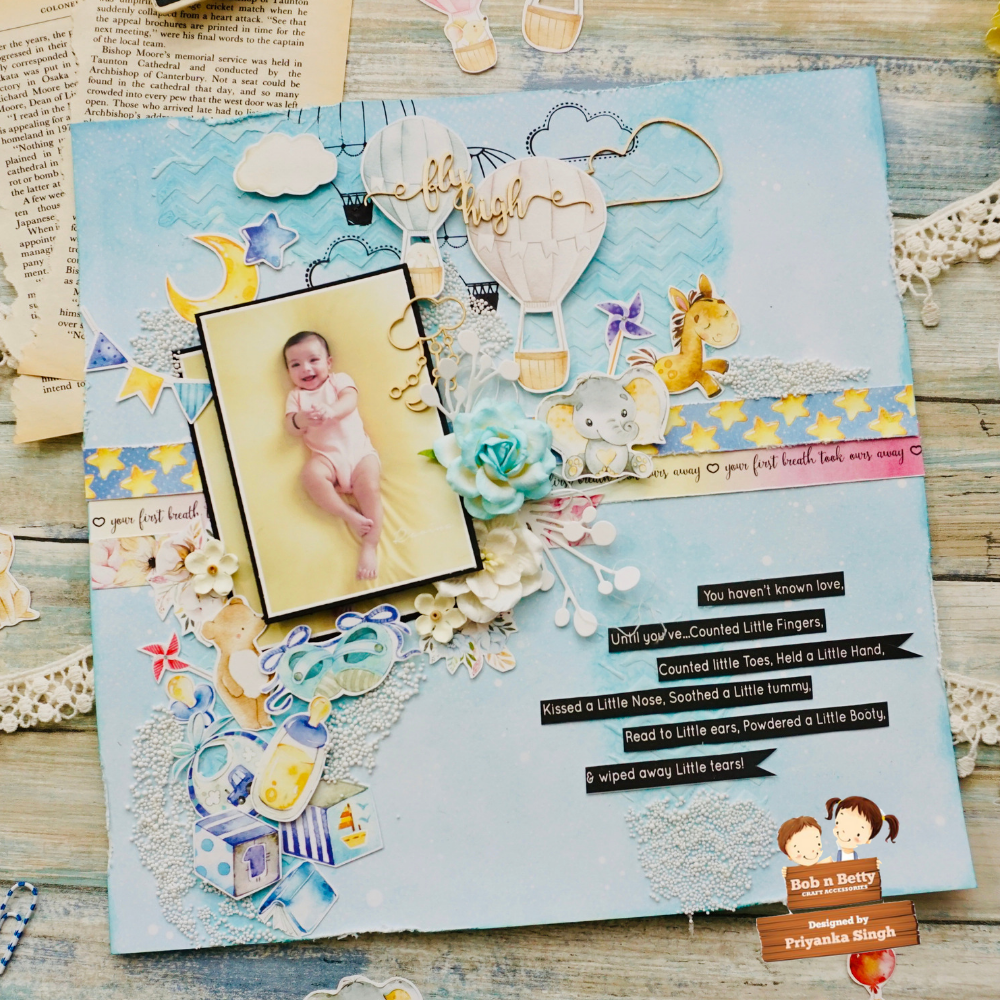
Here’s my layout, creating a whole world around the baby boy, when it’s all about running after him, keeping him involved with something to play and read….This complete collection offers tons of fussy cutting elements to add to you projects. I went ahead to choose some of them….adding to this layout.

To begin I have taken one of the light blue pattern paper from the collection and base coat with clear gesso to make my inks stay on it….further went ahead to some stencilling and inking to background.

And placing all the elements around the baby picture finishing with the sentiment from the collection itself.

To add some more to the look went ahead to sprinkling some micro beads here and there…

Some close up pictures :


Hope u enjoyed reading about my very first project here, do leave your comments for me to know your thoughts…any queries are most welcome.

Paper Collection Used:

Much love and hugs
Priyanka

Mixed Media Layout by Tanya Cloete, feat. Roseate Paper Collection

Hello dear Bob n Betty friends.
Today I’m sharing a Mixed Media Layout featuring the gorgeous Roseate Collection. I have incorporated the matching decoupage papers into the layering. These decoupage papers are so pretty and so versatile.
Here are the instructions you may use to recreate such a project
1. Add some colour to the background on one of the sheets in the Roseate Collection using some white gesso and Impasto paints.
2. Add texture randomly using a stencil and white crackle texture paste.
3. Add paint splatters randomly over the page.
4. Cut a few die cut shapes from the collection sheets and decoupage papers to form the layering of the composition.
5. Emboss the chipboard pieces with embossing powders.
6. Fussy cut a few elements from the collection sheets.
7. Arrange the rest of the embellishments as per the picture or as you like.
8. Add some buttons and sequins for the finishing touch.
9. All done!
Thanks!
Kind Regards/Vriendelike Groete,
Tanya

A Scrapbook Page LO designed by Tanya Cloete, featuring You n I paper collection

Hello Bob n Betty Buddies,

Tanya here, sharing a Page Layout with the STUNNING You and I Collection! The colours on this layout are truly magical and fit so well together!

Here are the Instructions you may use to recreate such a project:  

  1. Use white cardstock as the base for your layout.
  2. Tear 2 pieces from one of the sheets in the collection as per the picture and adhere.
  3. Fussy cut some flowers, leaves and wording elements from the die cut sheet in the collection.
  4. Ink the sides of the cardstock using the Tim Holtz Speckles stencil and some distress inks and oxides.
  5. Add some white crackle texture paste using a circle stencil and apply over the inked stencil marks. Leave to dry.
  6. Randomly stamp some butterfly images.
  7. Add some random paint splatters on the page using black impasto paint.
  8. Paint 2 of the filigree chipboard frames with Finn’s Sparks Paint Iris Potion and Metallique Paint Golden Moss.
  9. Emboss the chipboard frame (photo) with white and chippie title with black embossing powder.
  10. Cut 3 butterflies from the collection sheet using the Tonic Studios Wings and Things Die.
  11. Cut a few leaves from green and white cardstock using the Creative Expression Die Swirly Leaf Trio.
  12. Arrange the rest of the embellishments (flowers, leaves, gauze, buttons, sequins) as per the picture or as you like.
  13. All done!

Here are the close ups of this layout…

Hope you like this as much as I enjoyed making it!

Happy Papercrafting!
Tanya Cloete

Scrapbook Page LO designed by Jaya Raghuvanshi, feat. Little Wonderland Paper Collection

Hey there,

I have designed a scrapbook page Layout with Bob n Betty’s Little Wonderland Paper Pack and there is a step by step tutorial too. Check it out here…

Much Love
Jaya

A Scrapbook Page Layout by Riddhi Jani, featuring Little Wonderland paper collection

Hey guys,

Riddhi here and I have made a layout using the cutest papers by Bob n Betty “Little Wonderland”
These papers are so vibrant and lively. If you haven’t tried this pack yet, now is the time…..you will fall in love with all the cute elements of this collection.

So the theme of my layout is Childhood and as they say “If you carry childhood with you, you never become old “ This quote is perfect for my layout.
over to the pictures now….


I hope you like my project
Thanks
Riddhi

Mixed Media Layout designed by Jaya Raghuvanshi, featuring Cottage Blush paper collection

Hi everyone,

Jaya here with my debut post for Bob n Betty. I have used the very elegant Cottage Blush paper collection to make a layout.

here are some handy instructions you may refer to design a layout for yourself.
1. Give a coat of matt gel medium/ clear gesso on the paper and dry thoroughly.
2. Use modelling paste and one or two different but similar pattern stencils and add some texture to the page. You can also use some mica powders or dry pigment powders to color you modelling paste.
3. Fussy cut some beautiful rose images and post card images from the collection. Distress the edges using vintage photo distress ink.
4.Now, add some color to the background. You can use sprays, watercolors or anything that is a little forgiving. Spray a little water to make the colors flow and mix with each other. Do not over use water.
5. Start preparing your cluster. Add the fussy cut images and your pic.Embellish with flowers and chipboards.
6. Add some colorful splatters and doodling if you wish to. Use gel medium to add some Finnabair Art stones for detail. Finish off with the title.
Hope you liked my project 🙂
I shall catch up with my next creation soon, till then happy crafting..!!
Cheers
Jaya

A Scrapbook Page LO designed by Bipasha K, featuring “You n I” collection

Hello friends!
Bipasha here and I have another detailed video tutorial for you today. I have been totally droolling over Bob n Betty’s latest release “You n I” 12×12 paperpad . I am in love with the versatility and romantic vibe of this paper pad. It is packed with so many creative elements that you can make a myriad of projects: cards, mixedmedia, Layouts, tags!
Today I decided that I wanted to create a layout and focus on the elements and picture more than a title. Yes, I created a layout with NO title but I guess the message of LOVE is equally portrayed through the beautiful paper elements!


Please enjoy my video tutorial and see how I created this layout step by step.

here are some close ups of the layout…


I hope I gave you some ideas and your creative fluids would be flowing now! 🙂

Sending warm hugs,
Bipasha
xo

‘FINDING YOU’ a scrapbook page layout designed by Riddhi Jani, using “You n I” Paper Collection

Hello everyone,
Riddhi here, sharing my new scrapbook page layout, focusing the upcoming season of love.
I’ve named this layout “Finding You

Everybody wants to feel like someone cares. This is one of the truths in life. This is because we all need tenderness and love. We want to share our inner self with someone, we need to share our feelings with someone. Hence, in this layout the lady is trying to find her soul mate in the divine light of stars.

I’ve used the most gorgeous love theme paper collection “You n I” by Bob n Betty.

If you are working on a love theme project, mark my words…you are going to fall in love with this paper pack, which comes in the most unique color palette with great illustrations and sentiments.

If you have created something using this collection, do share it with us in our Facebook group Bob n Betty Buddies.

Till then enjoy and keep crafting..!

Thanks
Riddhi

A Scrapbook Page Layout designed by Tanya Cloete, using Little Wonderland Collection

Hello Bob n Betty Buddies,

Tanya here with a Page Layout “Great Outdoors” using the ADDORABLE Little Wonderland Collection! This collection is the cutest and is so versatile; it can be used to make any kind of project!

Here are the Instructions you may use to recreate such a layout:

  1. Use one of the sheets from the collection as your base.
  2. Cut 3 big strips using a sheet from the collection, blue and yellow cardstock. Punch the edges of two of the pattern strips using Martha Stewart punches. Adhere the pieces.
  3. Cut some shapes, banners and flowers using various dies to form the layering on your page where photo will be placed. I have used the collection sheets and some cardstock.
  4. Fussy cut some of the cute animal elements from a sheet in the collection.
  5. Emboss the chipboard titles (Ranger black) and chipboard frame (Lindy’s Purely White) with embossing powders.
  6. Arrange the rest of your embellishments as per the picture or as you like.
  7. All done!

Hope you like this as much as I enjoyed making it!

Happy Papercrafting!
Tanya Cloete

Mixed Media Layout by Riddhi Jani, using Bare Essentials Paper Pack

Hello everyone ,

I hope you are enjoying the ongoing wedding season,

I made my layout on this theme only. Marriage is a thousand little things, and I love to capture the beautiful memories of them. This time I’m making a Guestbook and not album. So the blessed couple can capture their blessings into it with their photos.

This layout is designed with Bob n Betty’s “Bare Essentials “ paper collection and as the name suggests, this undoubtedly is a necessity for any crafter. It comes in 18 different watercolor backgrounds, with 18 variety patterns. Isn’t it an awesome deal..?

And trust me this paper pack is a perfect choice for any kind of project, be it birthday, anniversary, love, baby, friendship etc…

They are a must have.

Here bare some steps you can follow to recreate this layout:

  1. Take 3 different Papers from the pack.
  2. Cut them with the help of Paper cutter. Layout size is 10”6.5 so I’m cutting the paper 1 inches bigger then the chipboard size. Fix it on the bob n Betty chipboard with using tacky tape or liquid glue.
  3. Take 2nd Paper and cut it 0.5 inches smaller then the layout size.
  4. Fussy cut the desired Paper design, which u can see in green colour on my layout.
  5. Arrange the layout with the photo and mark the space for photo.
  6. Add embellishments and chipboards of your choice
  7. Sprinkle some black liquid gesso for a lil messy effect on background.

And it’s done .

Its just a sneek peek of the acual project. I shall be back soon with the complete project.

Thanks
Riddhi