A Tea Chest designed by Jaanhvi Hinduja, featuring “Classics” collection

What is it about the old world that calls out to us in the 21st century? Old books, cameras, cassettes, bikes and cars – I so love them! I think the old world  was all about sophistication and glamour thrown in a good measure. Well! If you are somewhat a  vintage lover like me – Our new decoupage paper pack, ‘ Classics’  is right for you. With vintage elements thrown in the backdrop of old book pages, classic scripts and sober colour palette, just fill my mind with possibilities of creating some wonderful projects for my home 🙂
I will be sharing some of the projects that I make here for all of you in the days ahead. The first being a vintage tea chest that I’ve done with one of my favourite print from this collection.
Tea is intended to be savoured and tea time allows you to slow down and take a deep breath even when life is at its craziest. For those few comforting moments of your mornings, a beautiful chest to store your favourite flavours is an icing on the cake – isn’t it?
Let’s begin with a brief process to making one for your table –
I took a wooden tea chest, sanded and cleaned it nicely and painted the entire surface inside and out with an off-white chalk paint. Chalk paints have come to become a boon for decoupage lovers as it does away the need to prime the surface and gives a smooth finish. Next, I used masking tape to create stripes on the lower outer sides of the box and the inner lid. Then, painted the unmasked areas with blue paint (matched to the butterfly of the print). After removing the tape, I used a border stencil with texture paste to create an ornate border. When the border dried I painted it with watered down blue paint so that the stripes behind do not show strikingly. Next I decoupaged the outer lid with the butterfly print and did some random vintage script stamping.
I decoupaged a coaster with the remaining bit of paper. Applied varnish on the entire box. Next came the fun part to create a beautiful vintage English look on the box. I achieved this with my favourite product – antiquing wax. Have a look at the pictures how antiquing makes the border stand out and gives a warm vintage look to it. Finally, I pasted the coaster in the inside lid and adorned it with jute trims.
Hope you like the project! I’ll be more than glad to answer any queries that you may have in case you wish to make one for yourself.
I’ll share more projects with the new releases soon, and would love to hear what interests you and design my projects accordingly.
Till then, enjoy your tea:)
Love,
Jaanhvi

Scrapbook Page LO designed by Jaya Raghuvanshi, feat. Little Wonderland Paper Collection

Hey there,

I have designed a scrapbook page Layout with Bob n Betty’s Little Wonderland Paper Pack and there is a step by step tutorial too. Check it out here…

Much Love
Jaya

Vintage Mixed Media Tags Designed by Preeti Datta using Bob N Betty Decoupage Papers

Hi friends 🙂

Preeti Datta (aka Dutt Preety) here. How are you today?

Bob n Betty will soon be celebrating it’s 3rd Birthday on 28th April, yay!! Everyone at the Bob n Betty family is very thankful for all the love & support bestowed on us. To celebrate, there will be lots of fun events & giveaways. One giveaway is already under way, to check out all the details of the giveaway & for your chance to win superb prizes, please visit the Bob n Betty Facebook page.

Today, I’d like to share two Vintage Mixed Media Tags. I created these using Bob N Betty’s gorgeous Decoupage Papers. These papers have classy designs and there are tons of designs to choose from among many collections. Over here, I used two of the older collections, Glam Craft and Vintage Wheels. These decoupage papers can be used to make different paper craft projects including scrapbooks, cards, tags etc It is really worth looking at all the brilliant inspiration the Design Team at Bob n Betty have come up with in the past.

 Vintage Mixed Media Tags:

Couple 1

Mixed Media Tag – Joy

joy tag 1

joy tag 3

joy tag 4

joy tag 5

joy tag 6

joy tag 7

joy tag 8

Mixed Media Tag- Create Art

art tag 1

art tag 2

art tag 3

art tag 4

art tag 6

art tag 5

Process:

Started by cutting one of the vintage design decoupage papers from Bob n Betty’s Vintage Wheels Collection & distressing the edges. Since I was making a pair of tags, I worked on both together, using similar supplies on both but changing the composition a little to create variation. Matted the paper with black cardstock. Did background stamping with archival inks. For the layers, used a few, small bits of papers from the Glam Craft Collection, lace, gauze, buttons, chipboards, paper dolls, flowers, dried hay & stalks, thread & wooden alphabets. Embellished with a few Nuvo drops, Liquid pearl drops & sequins. Then created some white splatter with watered down white gesso. Foam mounted the panels onto white cardstock and threaded some natural twine at the top of the tags. In the end, for shine, added Inka Gold & Prima Waxes in some areas with my fingers.

Bob n Betty Supplies Used:

Vintage Wheels Decoupage Specialty Papers

VIW004

Glam Craft Decoupage Specialty Papers

GC004

That is all for today.

Please do share your gorgeous creations using Bob n Betty papers with us on our facebook group Bob n Betty Buddies. 

Remember you can always purchase all the beautiful Bob n Betty products from our wonderful Sales Buddies. 

Thanks for your precious time 🙂

Stay Blessed!

Preeti D.
preeti-dutt

Altered Cookie Can designed by Tanvi Shah featuring Cottage Blush Paper Collection

Hello, this is Tanvi again with my inspiration for the day.

For my project today the inspiration was the “Cottage Blush” collection so floral & so shabby.

cottage-blush-1140x6591

I worked my way to making a flip album using these gorgeous papers,  half way through & I realized it looked very similar to the wallet mini I made earlier! So while that incomplete project sits on my table an alternative 3D project came to life & am so glad it did! That’s the story of the altered cookie can I share today.

Here are some close ups of the cannister –

F18036
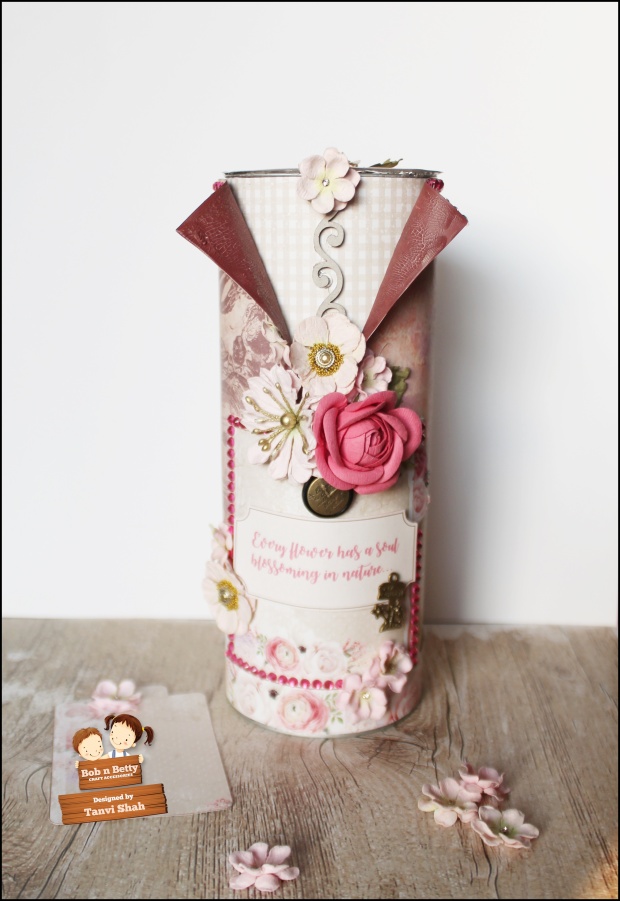
I used some distress crackle paint for some textures over the distressed folds here –

F18037

Flowers & charms from my stash added much to the shabby look –

F18038

F18039

F18040

F18041

F18043

F18044

F18045
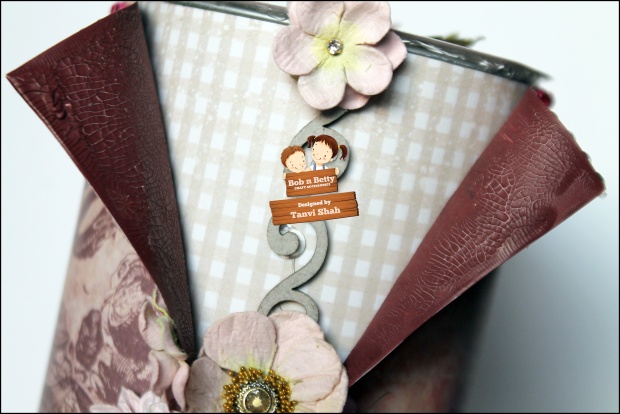
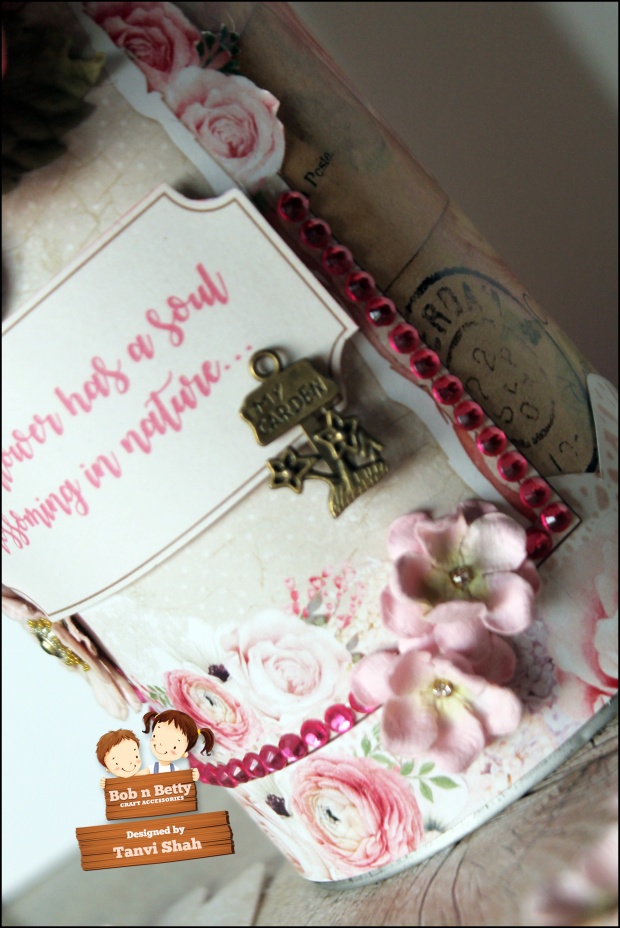
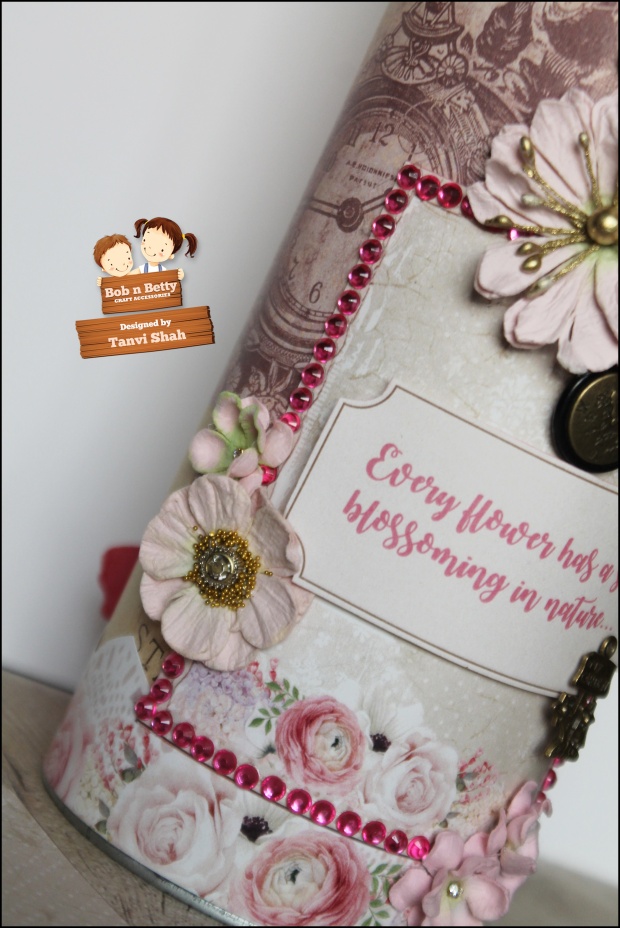
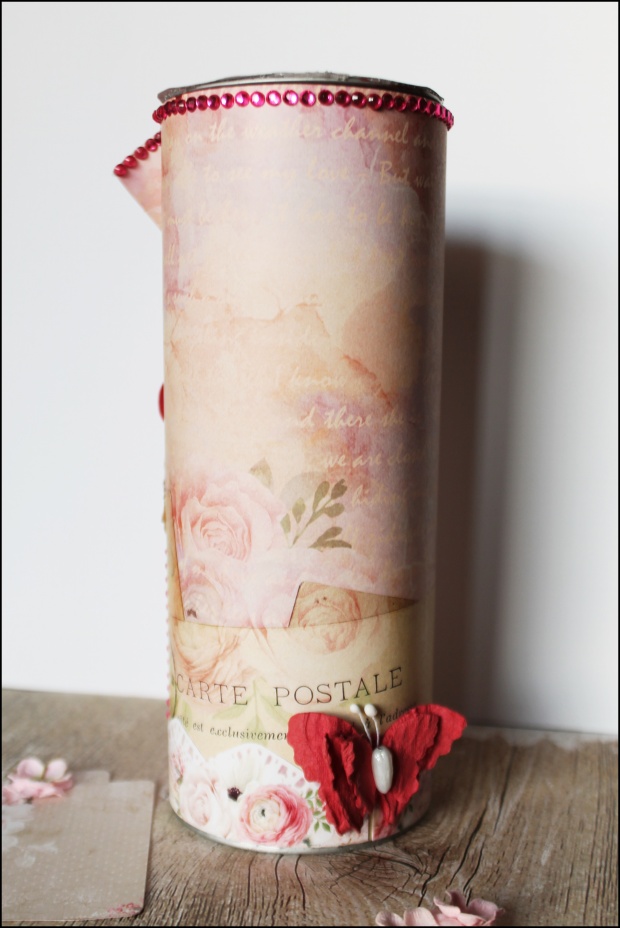
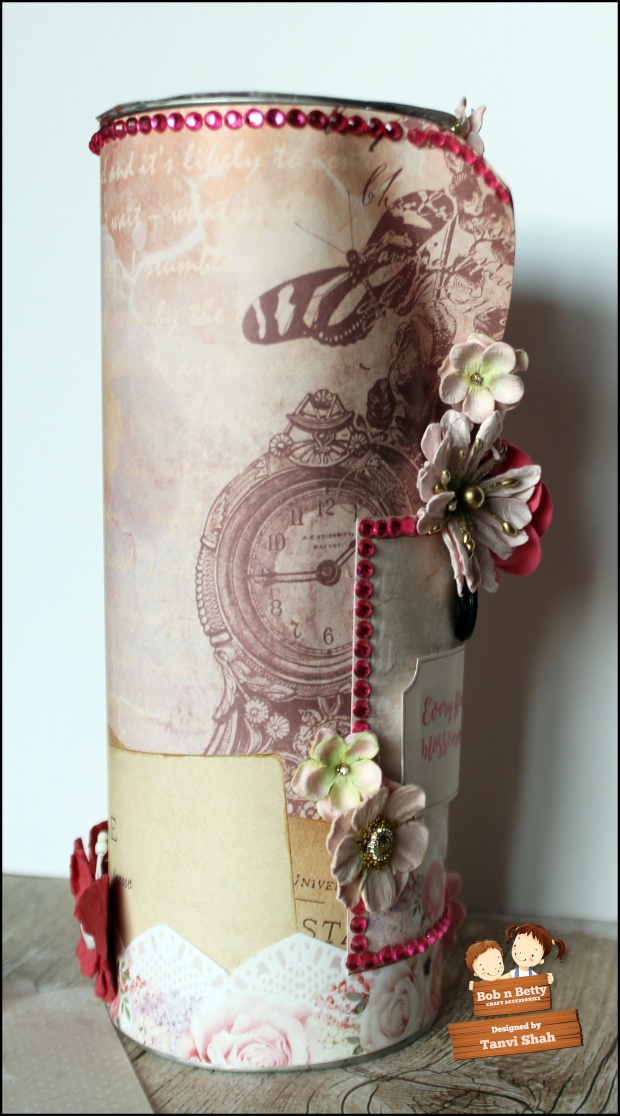
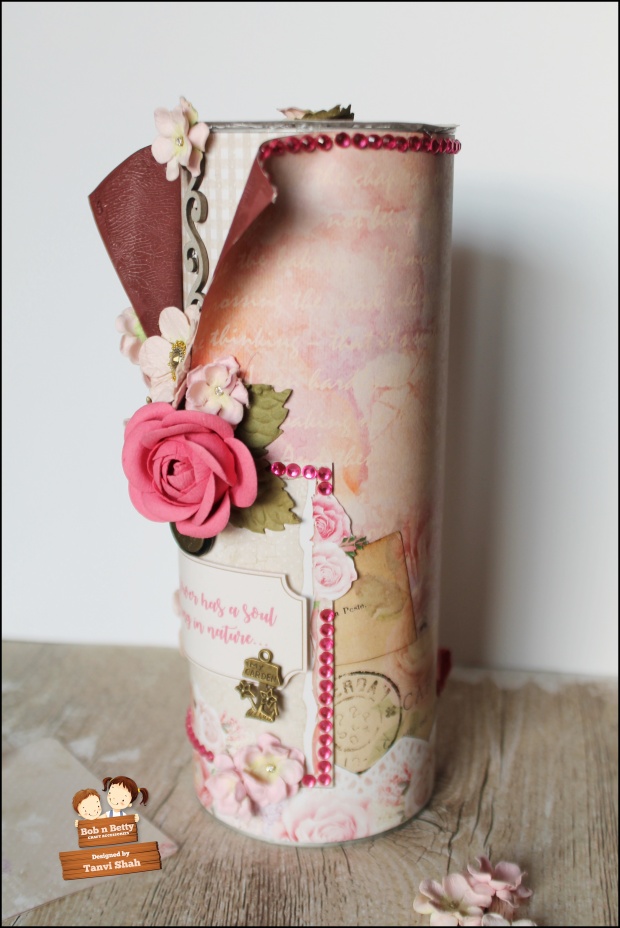
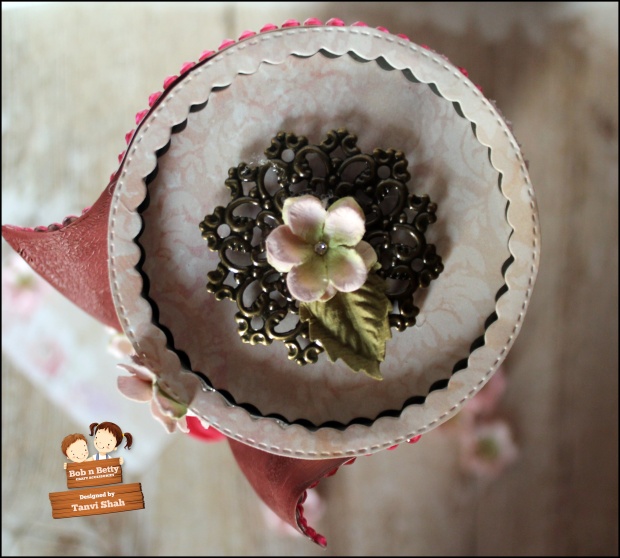
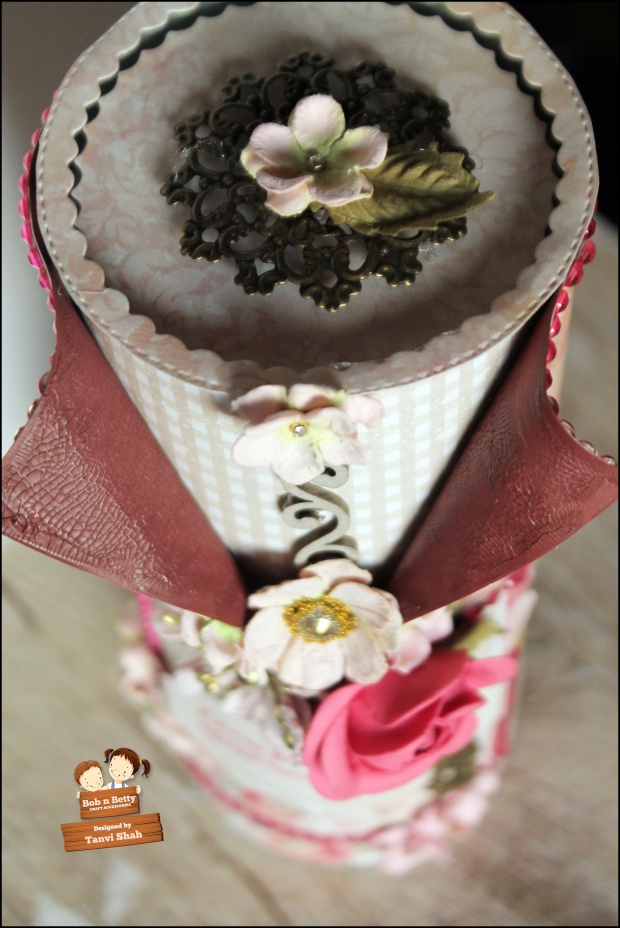
The gorgeous altered can makes a unique box to hold a gift, an invite or even a letter or simply fill it up goodies & candies!

Thanks for visiting today & have a wonderful week!

tanvi-shahBNB


A Scrapbook Page Layout by Riddhi Jani, featuring Little Wonderland paper collection

Hey guys,

Riddhi here and I have made a layout using the cutest papers by Bob n Betty “Little Wonderland”
These papers are so vibrant and lively. If you haven’t tried this pack yet, now is the time…..you will fall in love with all the cute elements of this collection.

So the theme of my layout is Childhood and as they say “If you carry childhood with you, you never become old “ This quote is perfect for my layout.
over to the pictures now….


I hope you like my project
Thanks
Riddhi

You n I Cards : Video Tutorial by Niharika Gupta

Hi Everyone,
A warm welcome to the Bob n Betty blog. I hope the weekend gave you enough sparkle to make the rest of the week shine.

My post today, is inspired by all card makers here. I usually don’t make cards, but I sure wanted to try hands on making simple cards after seeing the beautiful elements of this paper collection. Apparently, every new paper release by Bob n Betty becomes my new favorite, but I am totally addicted to this particular paper pack You n I.
And guess what, I decided to make a tutorial for you all. Yes, its my first video tutorial and I hope it will inspire you to experiment more with this collection. There are so many unique and interesting elements in there, that you won’t need many extra embellishments to decorate your cards. Let me show you a few pictures first.

I have 3 cards here and tutorial for two of these. My apologies, but after finishing the third card, I realised that my camera got switched off half way through. But don’t worry, let me compensate it with a little crafty tip, yaay!
Crafty Tip:  If you have been in a situation when you opened your glue bottle, or acrylic paint, or chalk paint bottle, and after few days, it is hard to open them, because the lid has got jammed? Well, I have been there many times, and I ended up cutting the bottles, or piercing a hole and then covering with a tape, and what not. But you can simply avoid it with this simple hack. Next time, when you open such a bottle, just apply a bit of Vaseline to the lid before closing it (just a little would do). And trust me, you will never find yourself stuck again.

As you all know, Bob n Betty’s 3rd birthday celebrations have begun, and there are some very interesting gifts to be won. So don’t miss this amazing chance. You can check the complete post here : https://www.facebook.com/bobnbettyindia/posts/2016361245280940
There are many more contests to be announced. So guys, gear up and play along !
Without taking more time, you can now enjoy the videos.

Here are some close up pictures for you….


I shall look forward to see you soon with my next post.

Love
Niharika.

Wall Shelves designed by Jaanhvi Hinduja, featuring Little Wonderland Paper Collection

Little wonderland! A one of its kind paper pack which is super cute and so.. so..versatile! Thanks to my teammate Niharika for lending the imagination for such a wonderful theme and designs!
I’m crazy about decorating the house and my son’s room has been long long pending..and the moment I saw the Little wonderland stack, I knew what I wanted to make 🙂
I’ve used the papers to the best of their design abilities and made some wall shelves. To justify the wonderland them i chose the shape of hut for two of my shelves. The stack has coordinated seamless prints with each design which makes the designs pop out when used together. Refer the pictures to see how the coordinated prints adds to the colours and cuteness of the designs.
I’ve also made a cloud shaped led lit name board for his room. The design of the little panda trying to reach to the stars through a window amused me and became the perfect background for the cloud name board. I use this cute little piece as a warm night lamp, while it also acts a decorative accent for the little one’s room:).
I didn’t want to stop here and so I also made a house shaped organiser for his pencils and colour pens. Here I used the cute element sheet and cut some figures and motivational phrase for decoration.
I am super happy to see his cute little room now :). If you liked the ideas and the projects, do hit like and leave some love.
Till then,
Happy decorating!
Jaanhvi

A mini album designed by Aditya Khaitan, featuring Little Wonderland paper collection

Hey Friends,

Aditya here and I am super excited to be guest designing for Bob n Betty with their much loved “Little Wonderland” paper collection. I have made a small scrapbook using this collection and I would just like to say that this is a must have paper pack in your stash if you are working on a kids project.
Over to the photographs now……

Hope you guys liked as much as i loved designing it.

Hugs
Aditya

Unicorn Paper Cake designed by Tanya Cloete, featuring Little Wonderland

Hello Bob n Betty Buddies,

Tanya here with an OTP project, a cute Unicorn Paper Cake using the ADORABLE Little Wonderland Collection! I am obsessed with Unicorns and found some awe inspiring Unicorn cakes on Pinterest and couldn’t resist but try out one using this cute pattern paper!

Tutorial:

1.  Silhouette:
Design ID #120857 – Tiered Cake Baby Elephant by Lori Whitlock
Design ID #206840 – Unicorn Crown by Little Luxuries Loft
Design ID #11567 – 3D Scalloped Cone by Alaa’ K
Design ID #37446 – Bow-Narrow by Snapdragon Snippets    

  • Cut a round box cake from the collection sheets and cardstock. Single Tier. Assemble accordingly.
  • Cut a cone from yellow cardstock, this will be used as the horn. Assemble accordingly.
  • Cut 2 ears (unicorn crown) from white and pink cardstock. Add Ranger Stickles (Sequins) to the pink inner piece and leave to dry. Fold the ears inward and staple the bottom piece together adhere to box using pins.
  • Cut a bow from the collection as well as cardstock and assemble accordingly.
  1. Cut hearts, doilies and butterflies from the collection and cardstock using dies.
  2. Emboss the chipboard title with Lindy’s Purely White.
  3. Add lace and rhinestones to the bottom section of the cake.
  4. Arrange the rest of your embellishments as per the picture or as you like.
  5. All done!

Hope you like this as much as I enjoyed making it!

Happy Papercrafting!
Tanya Cloete