With drums beating welcoming Durga Goddess to the Dandia nights its for sure festivals here in India. While at the same time we are prepping ourselves for the Festival of Lights lets gather our thoughts to create some beautiful handmade products which is unique with touch of love.
Today I have 2 different kinds of products. First sharing with you pillar candles. These are hand painted and then decoupaged with coordinating decoupage papers.
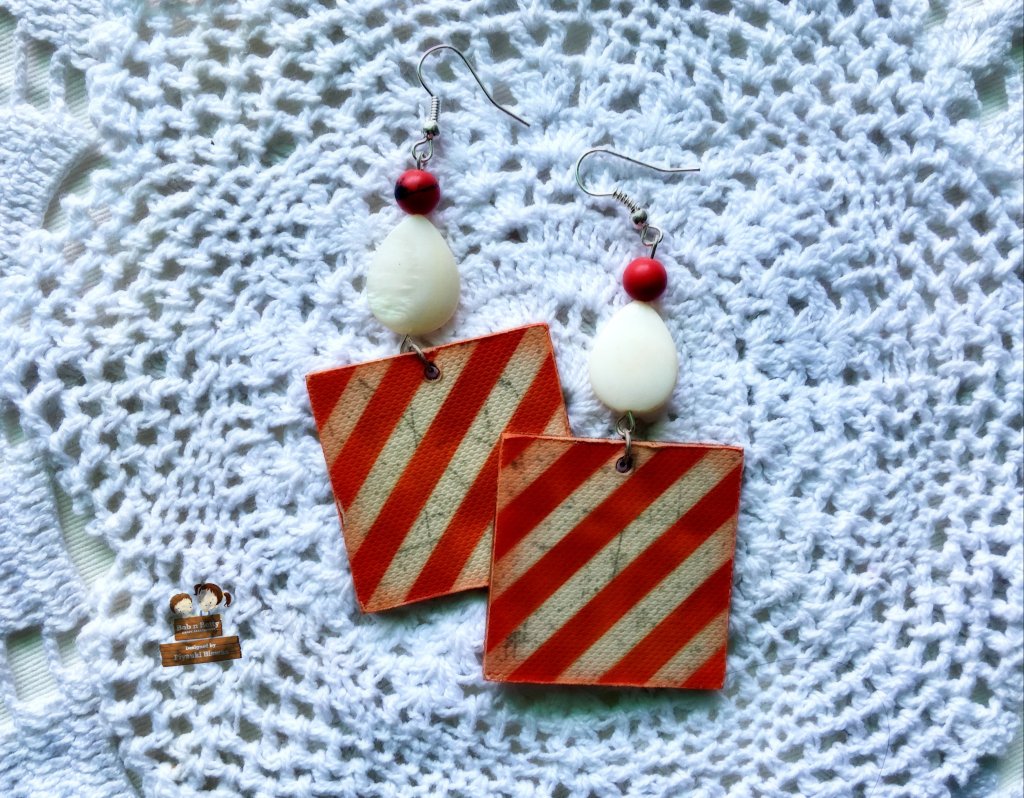
The second that I have for you all is a pair of earring which is also made using the super versatile decoupage papers, beaded with some stones and strings.
This is all I have for you! Will be back with some more fun exciting projects for all of us!
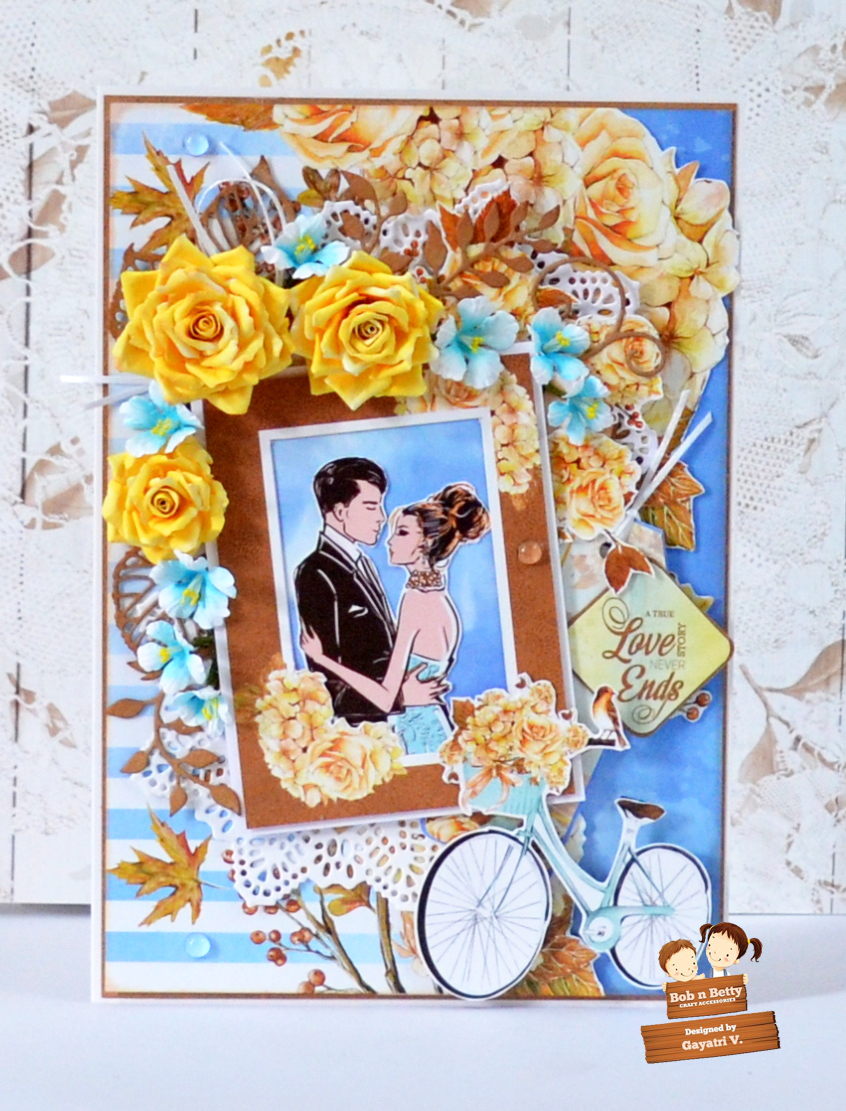
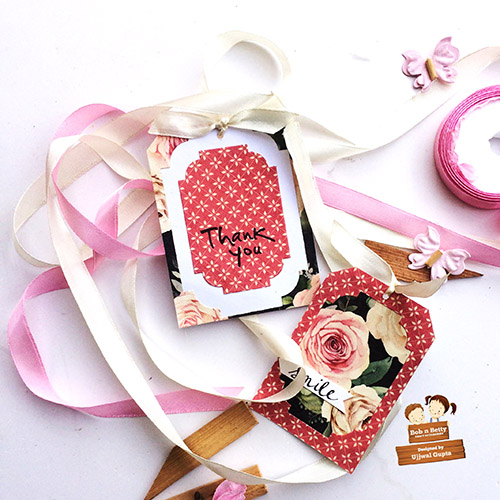
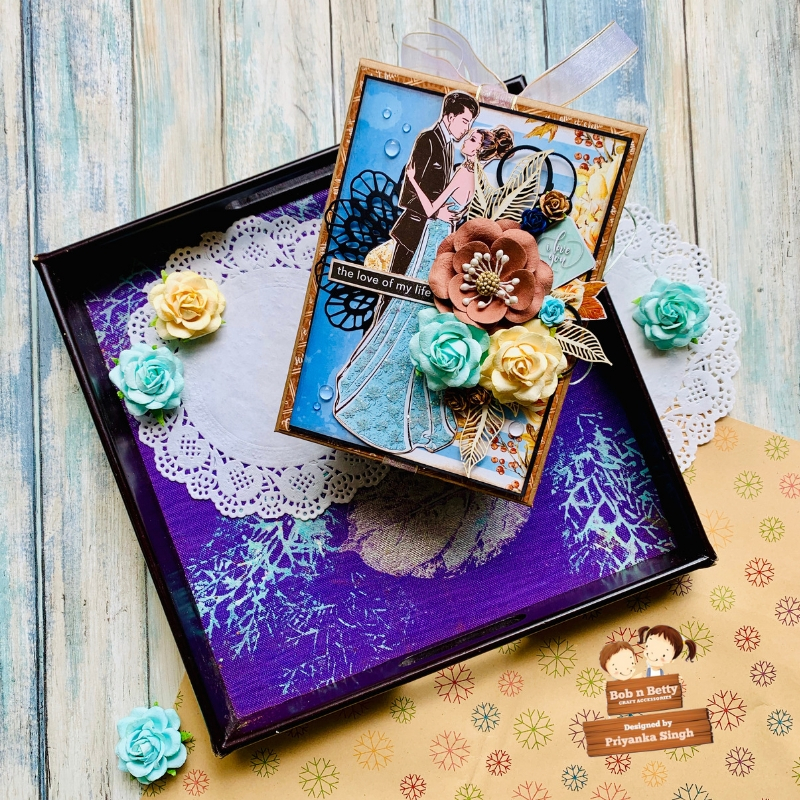
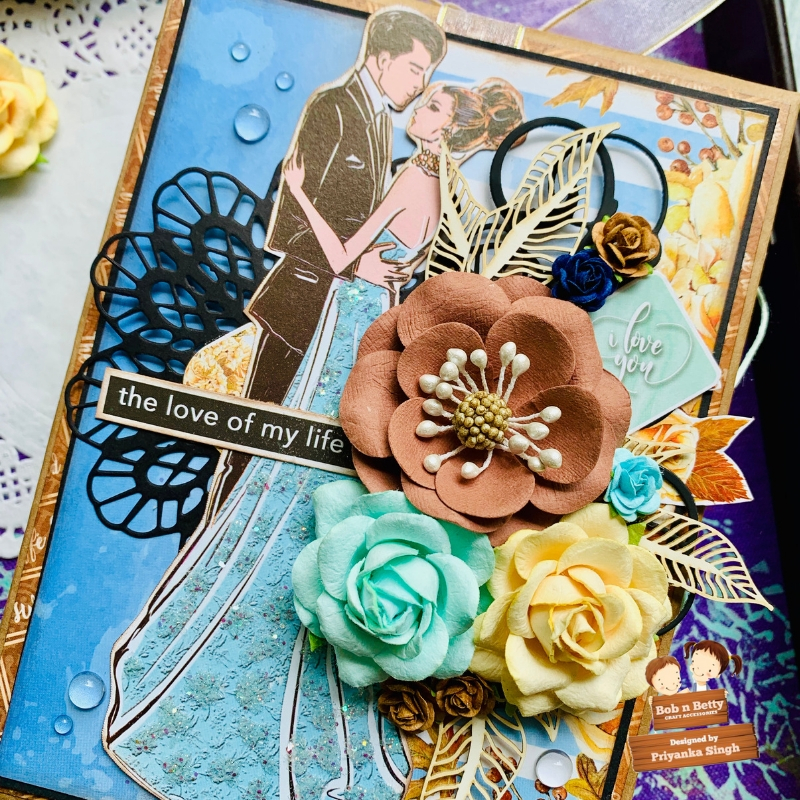
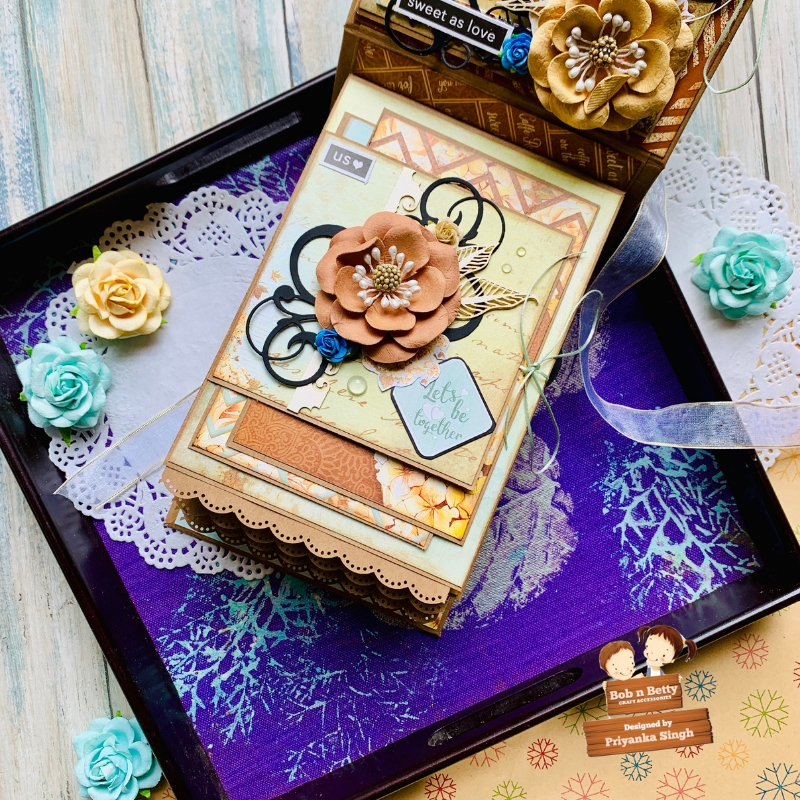
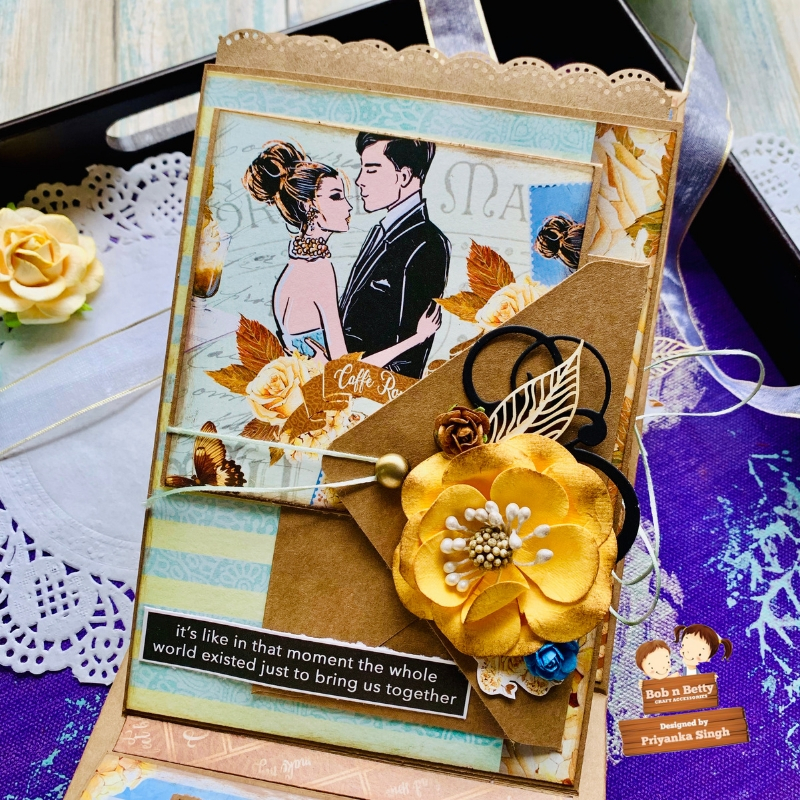
Today I am back with an inspirational card using the gorgeous ‘Caffe Romanza’ papers.
I fussy cut one of the papers and overlaid it so as to fit my card size. I layered my card base with kraft color cardstock and fussy cut pattern paper. I added chipboard piece under the fussy cut paper for dimension.
I added a few fussy cut elements and decorated the panel with my handmade flowers and die cut leaves.
To finish off added few clear drops.
Hope you liked my card. Thank you for stopping by, till next time – Happy crafting!!!
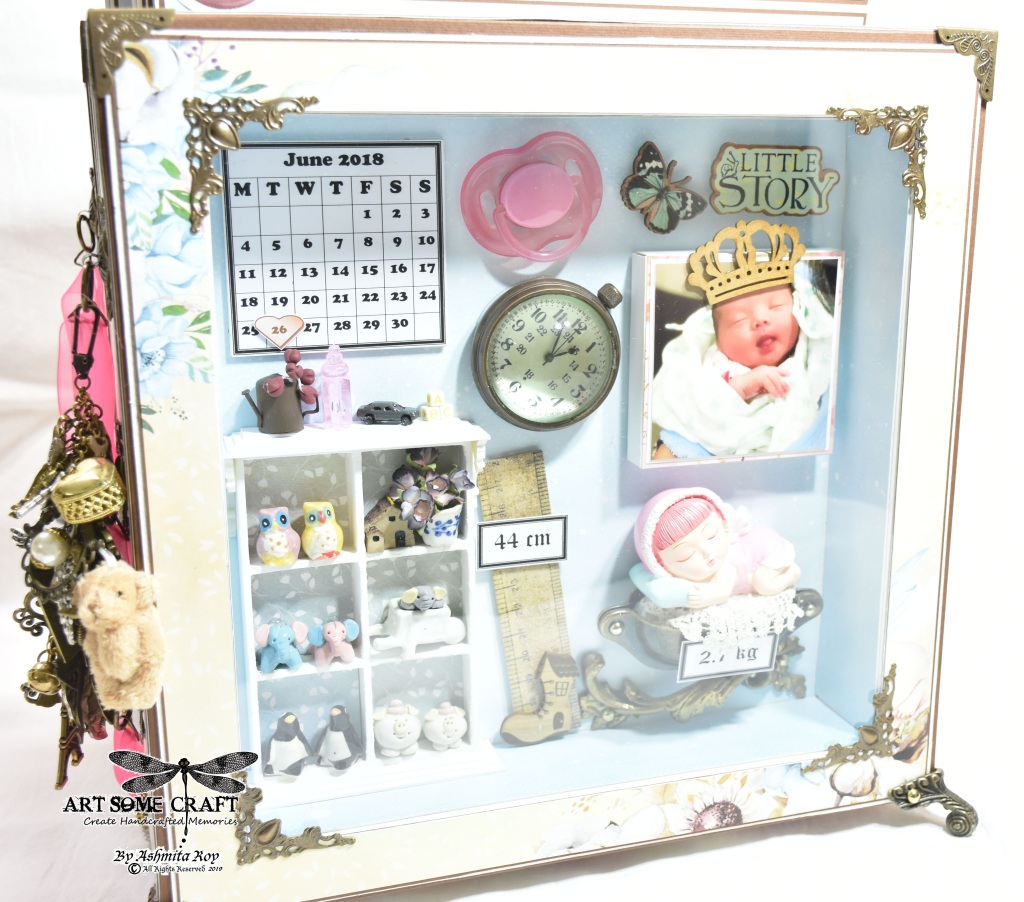
When I saw the Munchkin Collection for the first time my first thought was this was the paper I have been looking for the idea I had in my head.
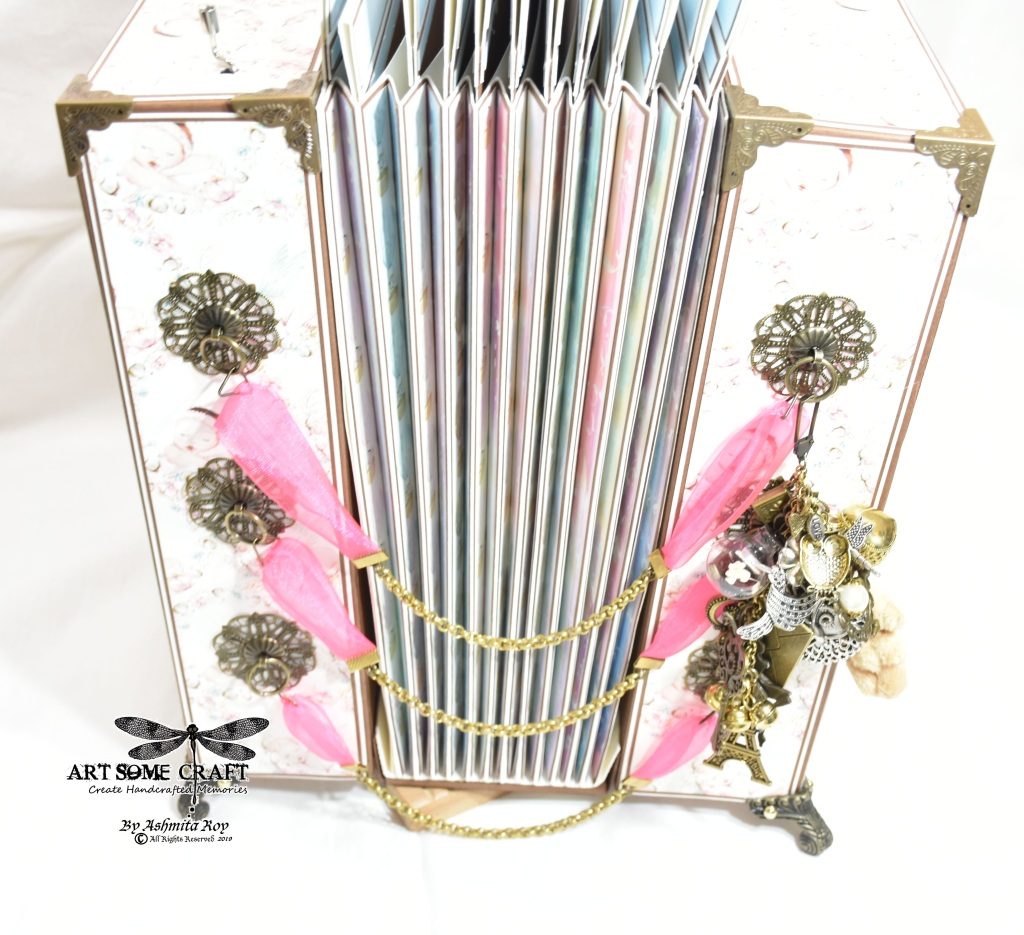
I wanted the perfect paper to create a Record Book for my daughter and this was the collection for it. So I created a 12″ by 12″ Accordion Tag box that holds 12 tags one for each month of my baby’s first year. I also created from scratch two shadow boxes that hold special details about her.
This Shadow box contains all her birth information, the time, date, birth weight and height. And I used lots of decorative elements to create a baby room type effect with miniatures collected by me from my various travels.This Shadow Box contains her first shoe and her first bunny toy and one of my favourite photos of her. I also incorporated a music box in this box.I custom made the side link chains and created a super duper chunky charm to compliment the huge size of this project.
There is nothing quite as exciting as waiting for the arrival of a new born baby. As soon as the baby is arrives, once world is filled with happiness and love and a truly undefined motherly feeling…which can not be expressed in as many words one try….
Kuddos to all my crafty friends,
Here I am back on Bob n Betty blogspot with another amazing inspiration for you all with the newly launched paper collections “Munchkin”…
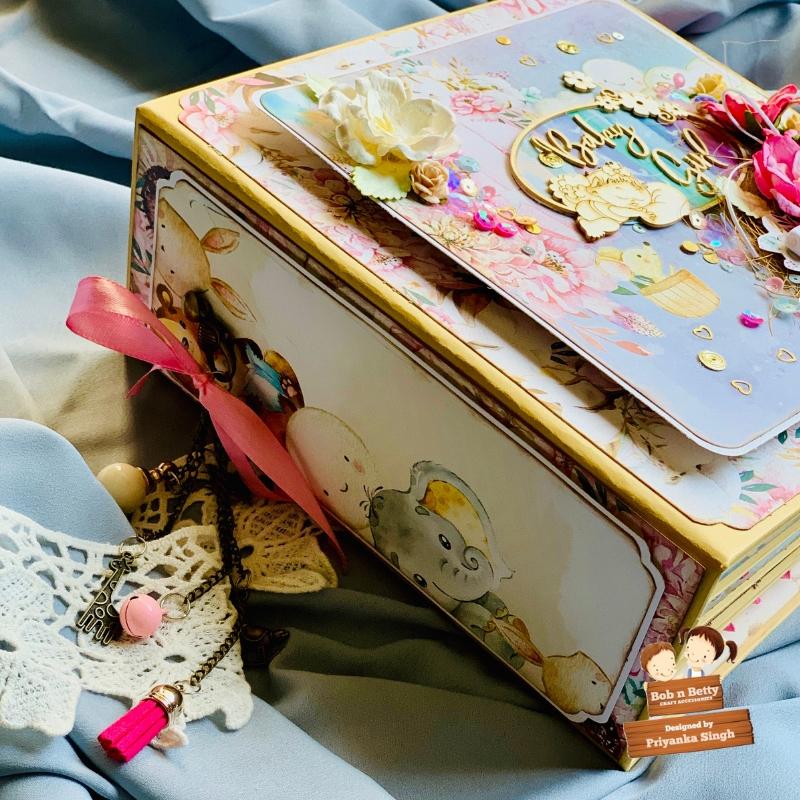
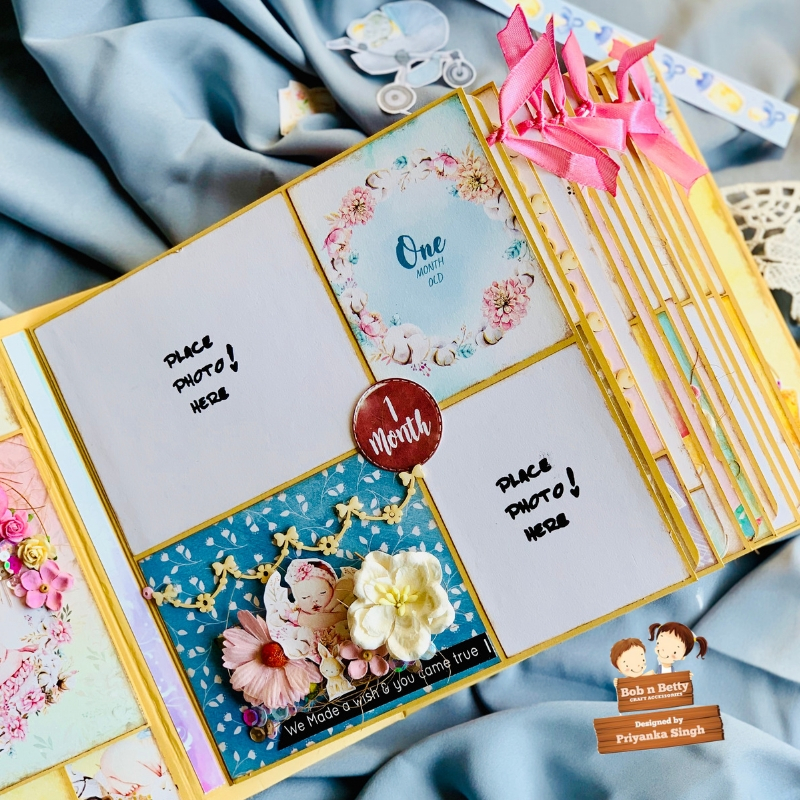
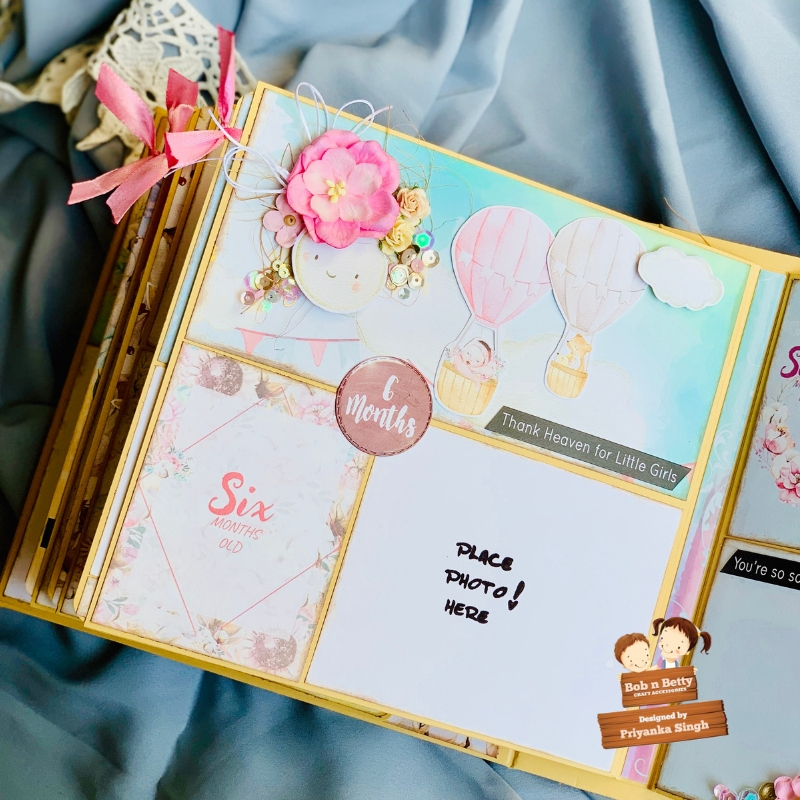
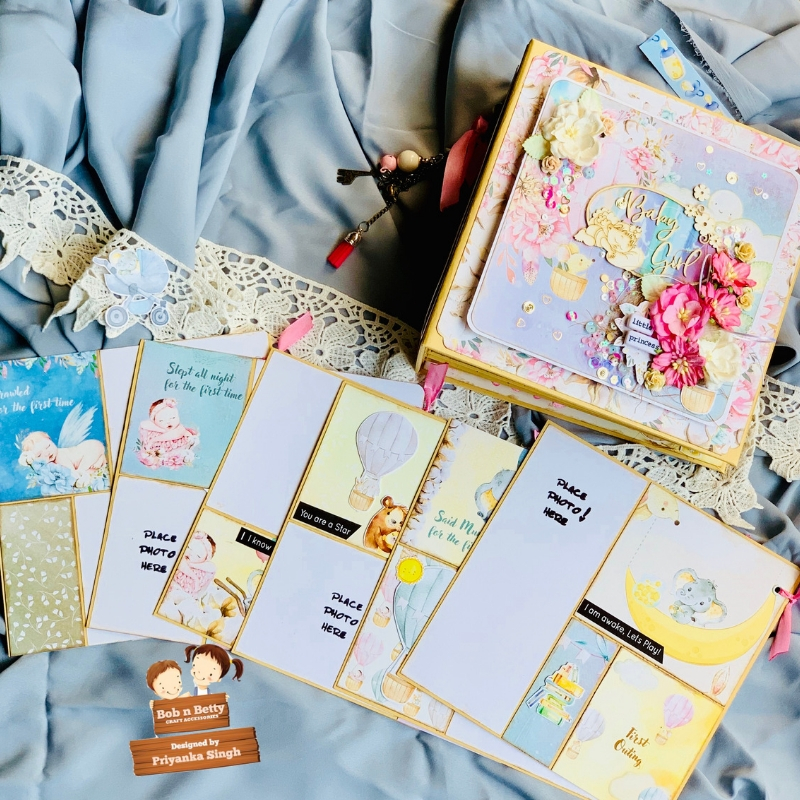
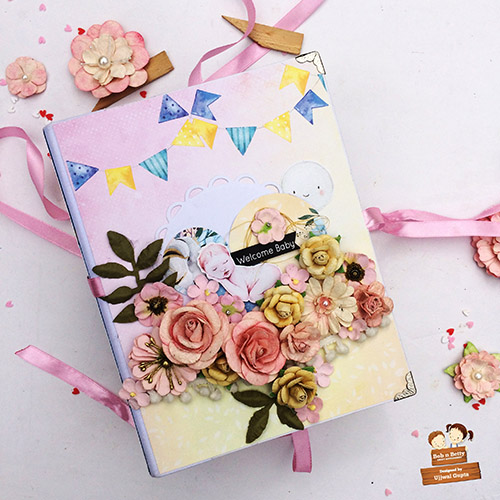
This time its a memory album for a baby girl “Little Princess”……As you all know this paper collection can be used for both baby girl as well as baby boy….I went ahead to create an inspiration with baby girl theme…This is how my cover page looks…with little arrangement of flowers to coordinate with florals within the collection itself…..
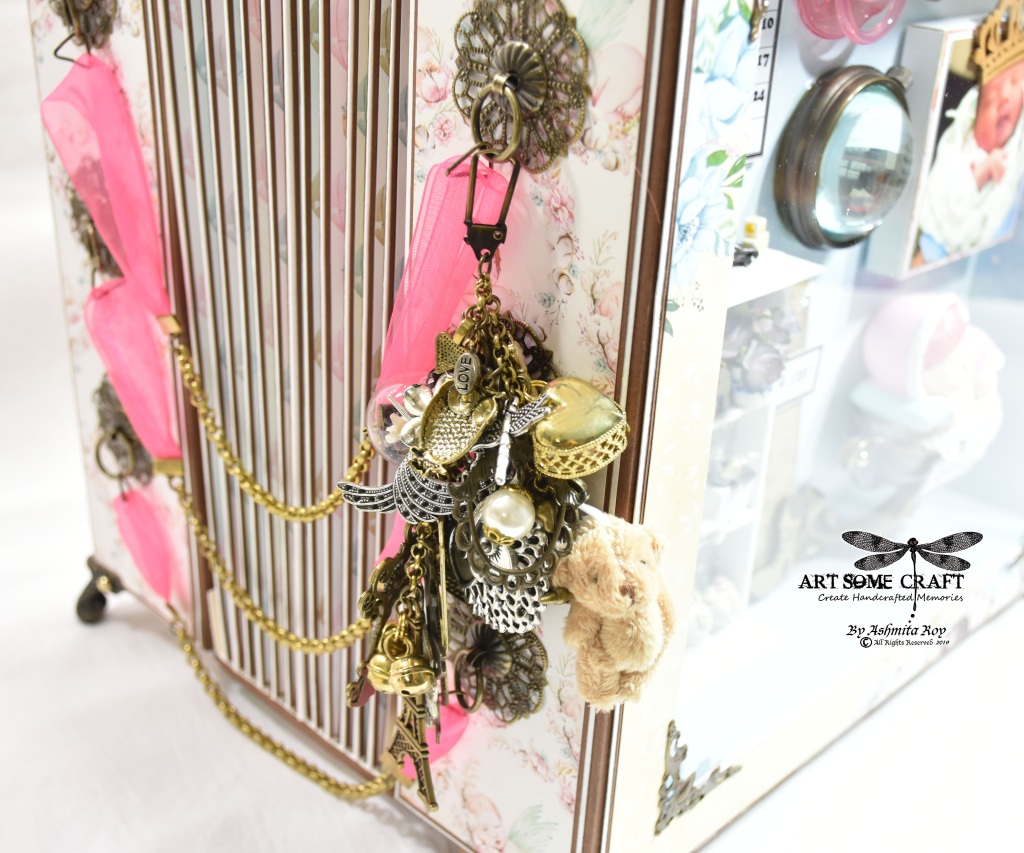
Here’s the hinge of the album with some metal charms and bells…. to adorn the whole layout…I am just loving everything about it….
Let’s quickly have a sneak peek inside the album…..
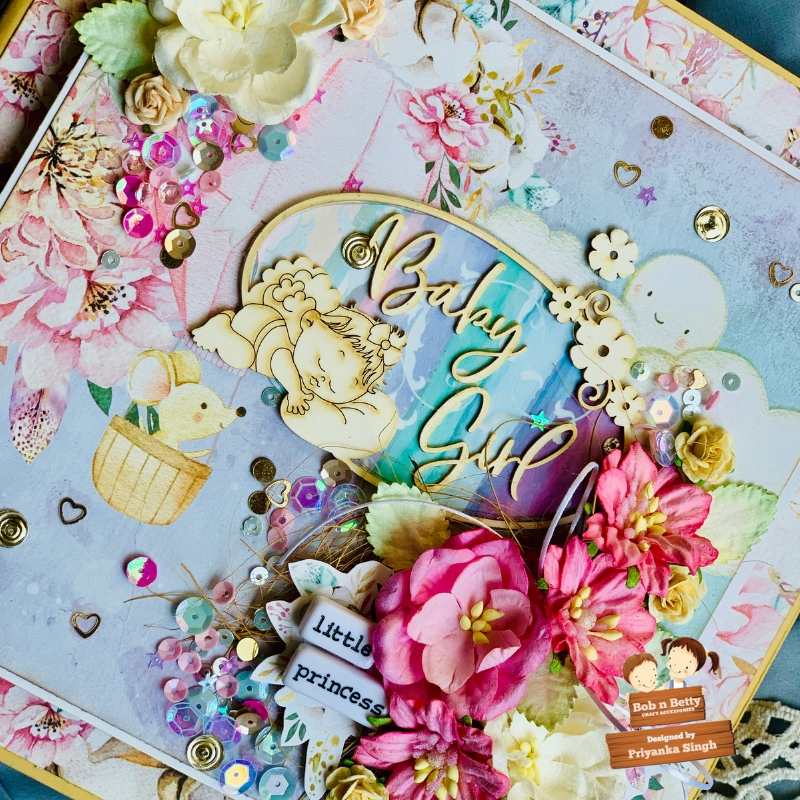
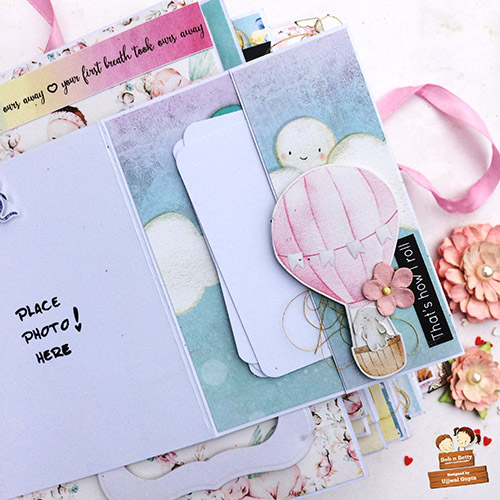
So talking about the inside pages…. I have tried my own way of doing just the photo mats and some cute layering with all those fuzzy cut elements within the pack along with flowers…and lots of sequins…around…
The very first page begins with welcoming the baby into this world…and that certificate of birth from the pack is just so hassle free to have it already…
The whole album covers all months from 0-12 as first birthday…as well as pull out pages for other milestones….this becomes an adorable way to make a memory book for your new born baby and look back at those memories anytime…
Here’s how the complete album comes out with all tags and cover page….
Hope you all enjoyed reading about inspiration project, will be back soon with some more amazing inspirations for u all to try and get inspired….
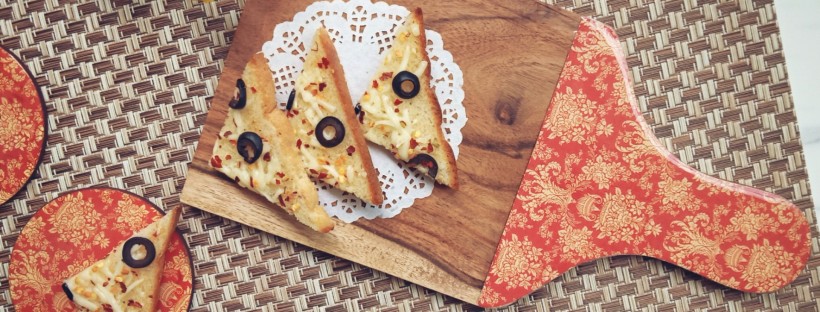
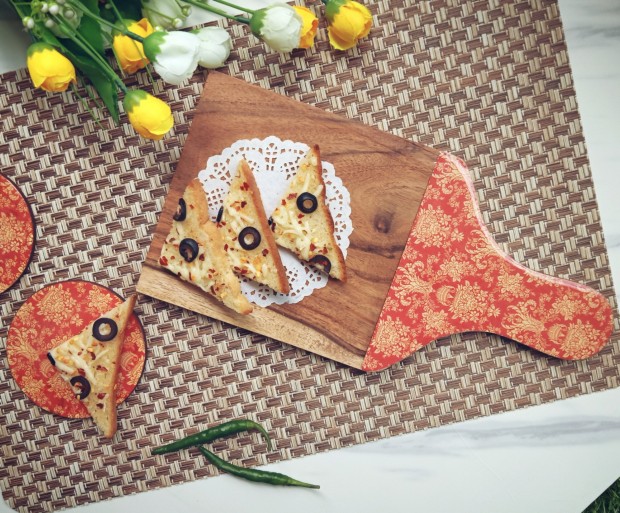
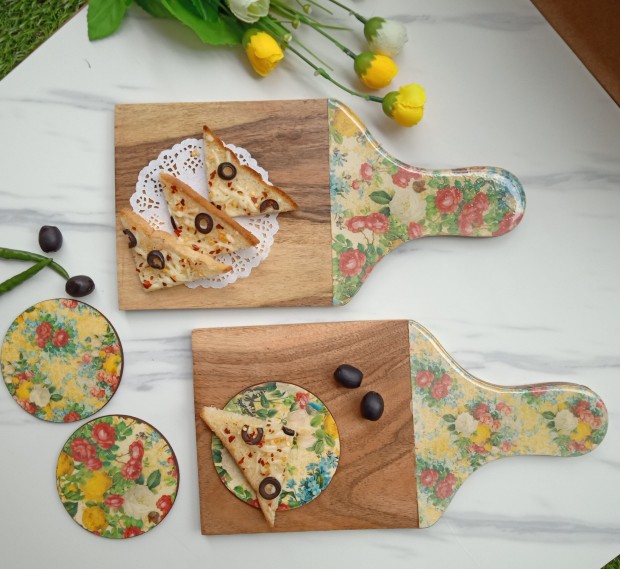
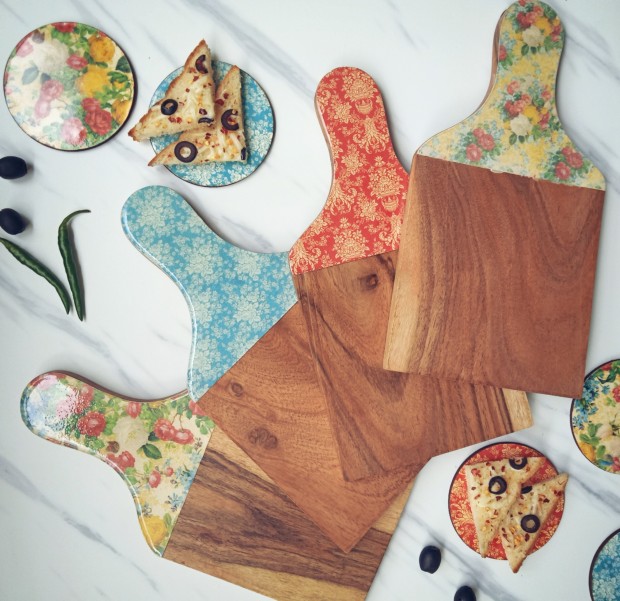
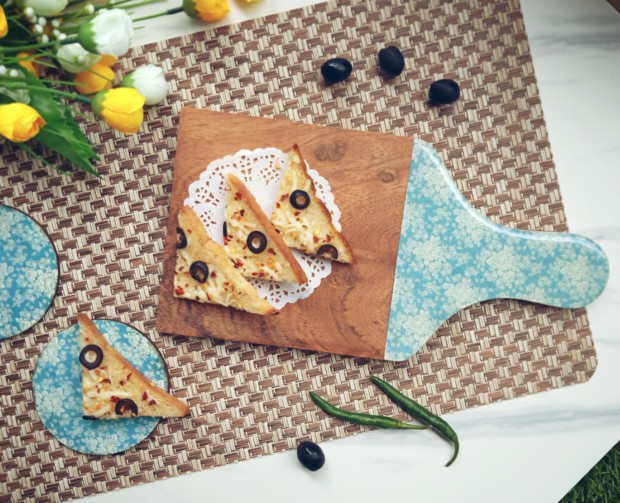
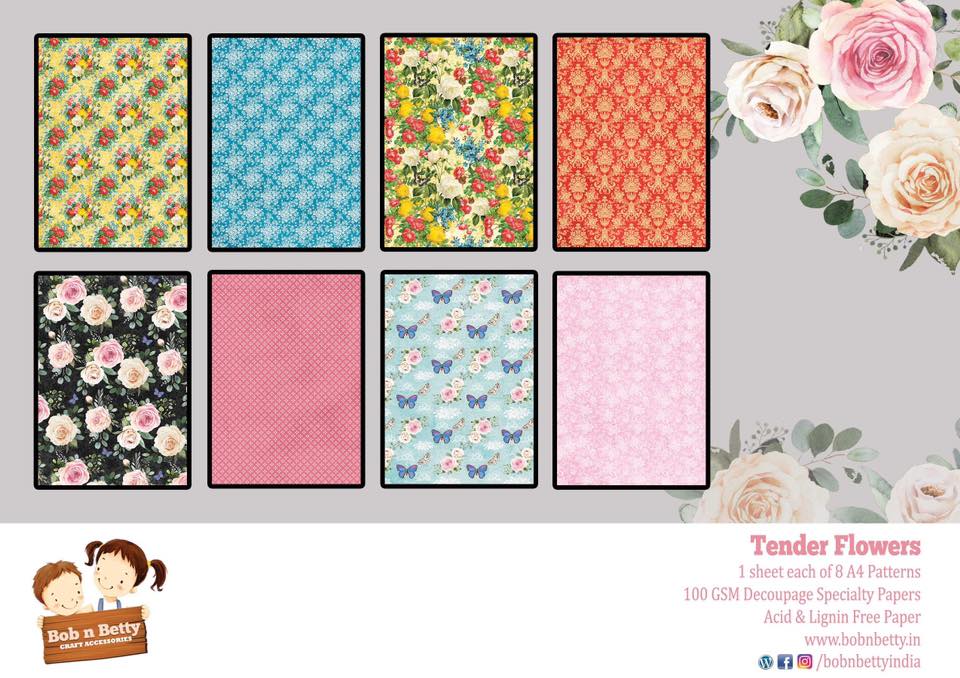
The sunshine is back…and so am I :). After a short hiatus, it feels wonderful to create new goodness. To celebrate my love for food, I’ve made wooden snack platters using the Tender Flowers decoupage papers. The seamless patterns make this set a versatile choice for varied projects – am sure everyone who’s used them would agree!
I’ve made platters before too, but this time I used acacia wood bases. I decoupaged only a portion of the base and poured resin on it. This is my second project using resin and it’s amazing to see the finished product – they practically do not look handmade 🙂
I’ve styled the platters with coordinated coasters and some yummy garlic toast! Check out the pictures while I relish my snack 🙂
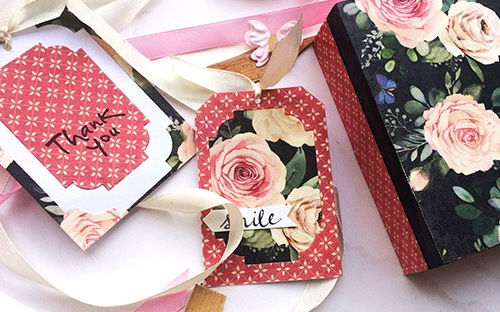
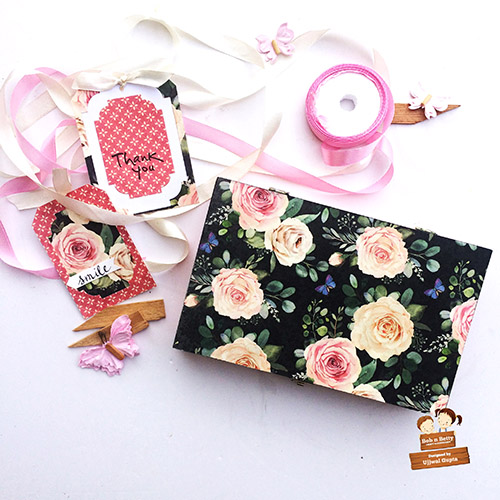
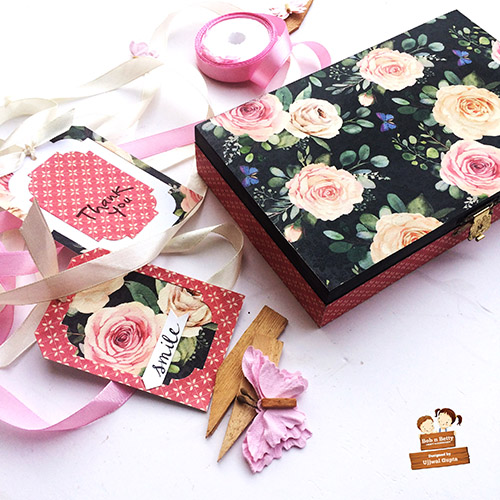
Hello there, This is Ujjwal and today I am sharing a decoupaged gift box idea with you. The festival season is just around the corner and these boxes would be perfect to add a special touch to the gift giving season.
Floral patterns work for any occasion and this beautiful Bob n Betty Tender Flowers Decoupage Paper Pack is just perfect with stunning florals and bright, happy colors.
I first painted the box with acrylic paints, inside and out. Then I used Mod Podge Matt to adhere the decoupage sheets on the top, the sides as well as the inside. Then I trimmed the excess paper with a paper cutter. Don’t forget to add a coat of Mod Podge on top of the paper too. The decoupage papers has a beautiful texture and I used the Matt finish Mod Podge to preserve that texture.
And, what’s a gift with a personalised message? Right? So, I used the left over papers and created these quick tags. Now all there’s to do is to fill the box with some sweets or chocolates or maybe some jewellery and surprise a loved one!
I hope you like this idea and will make your own gift tags and gift boxes in the upcoming festive season.
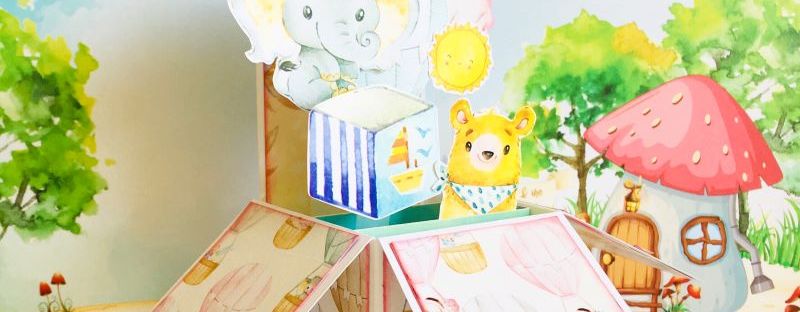
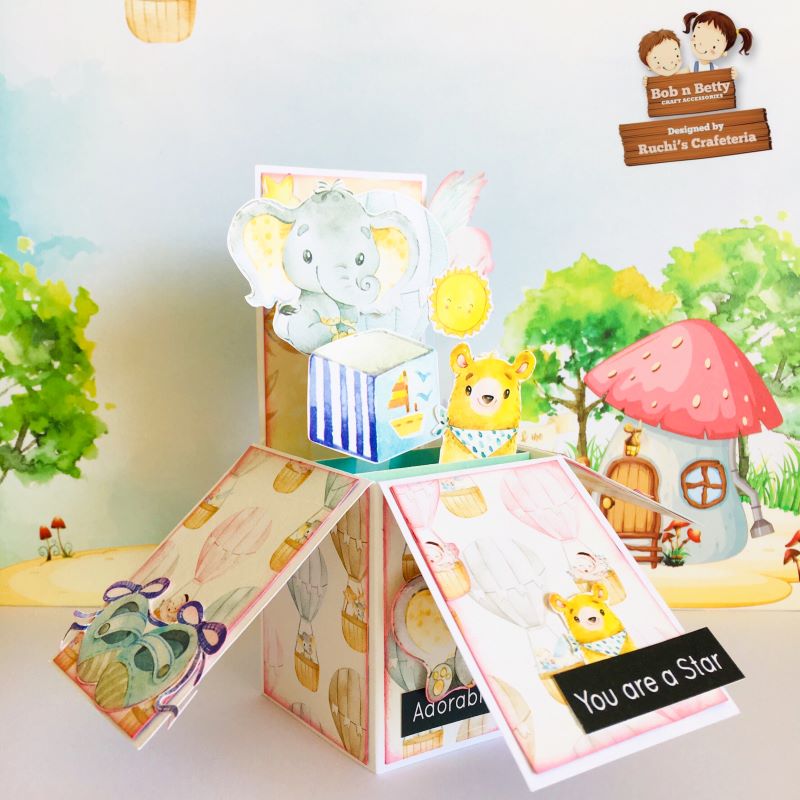
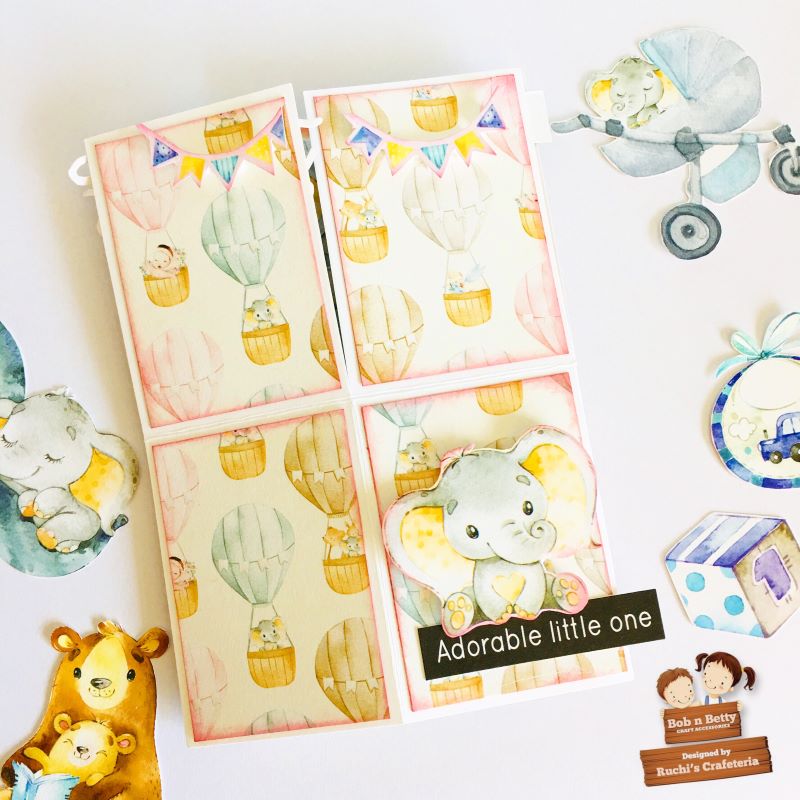
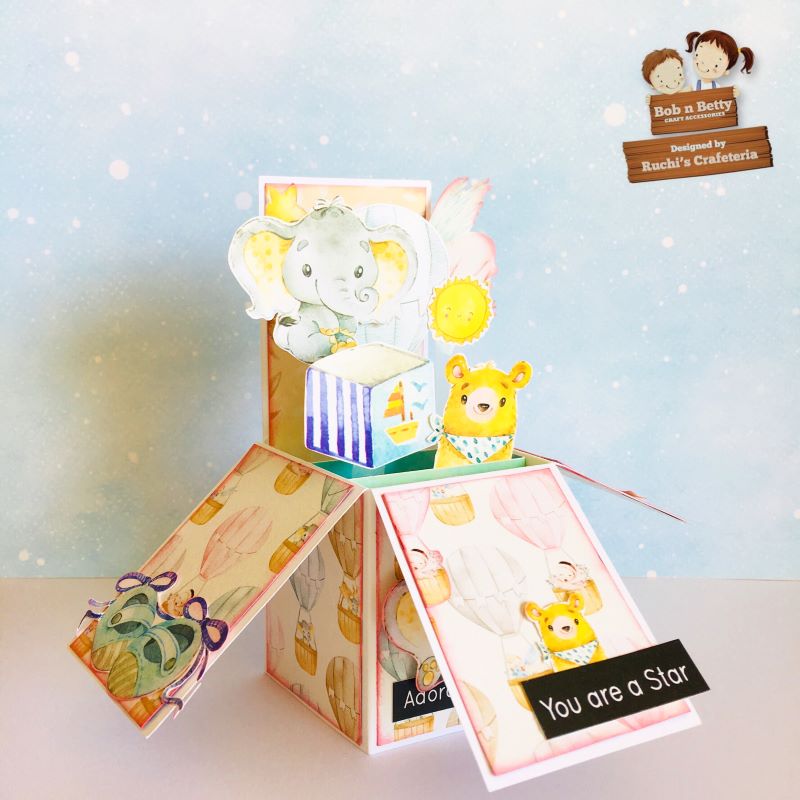
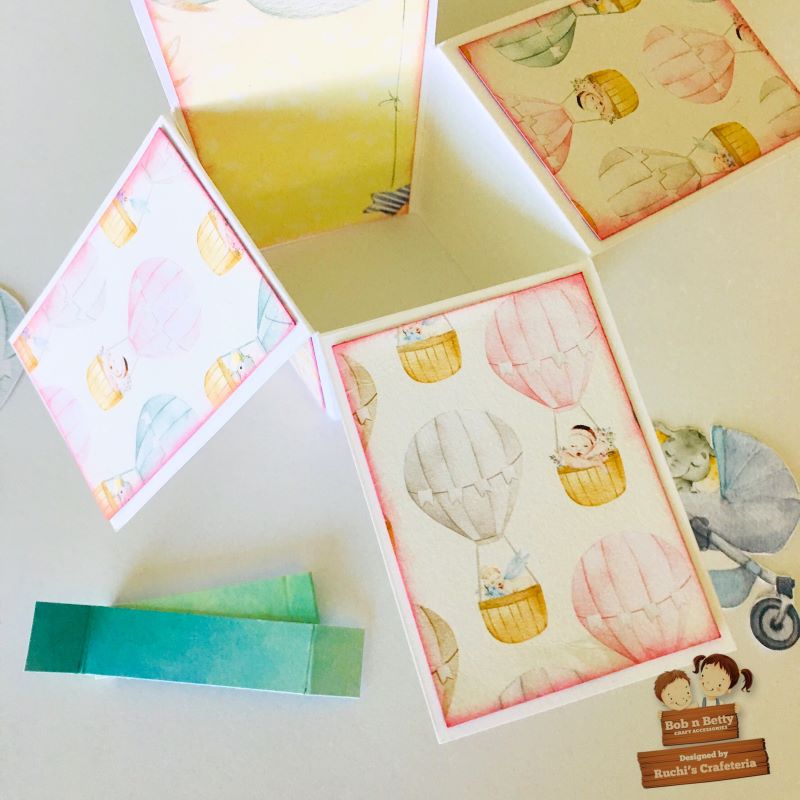
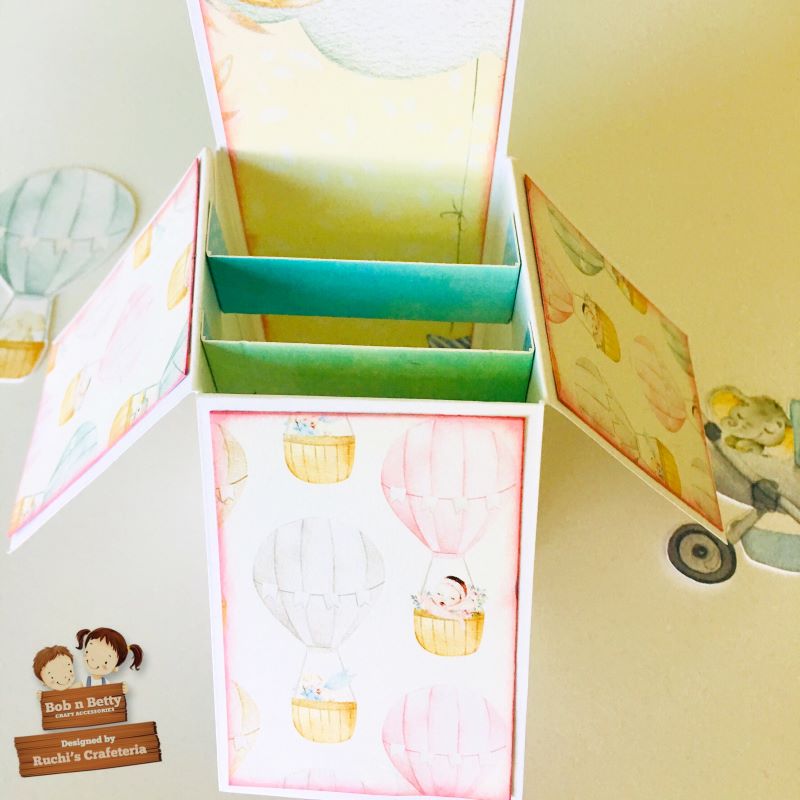
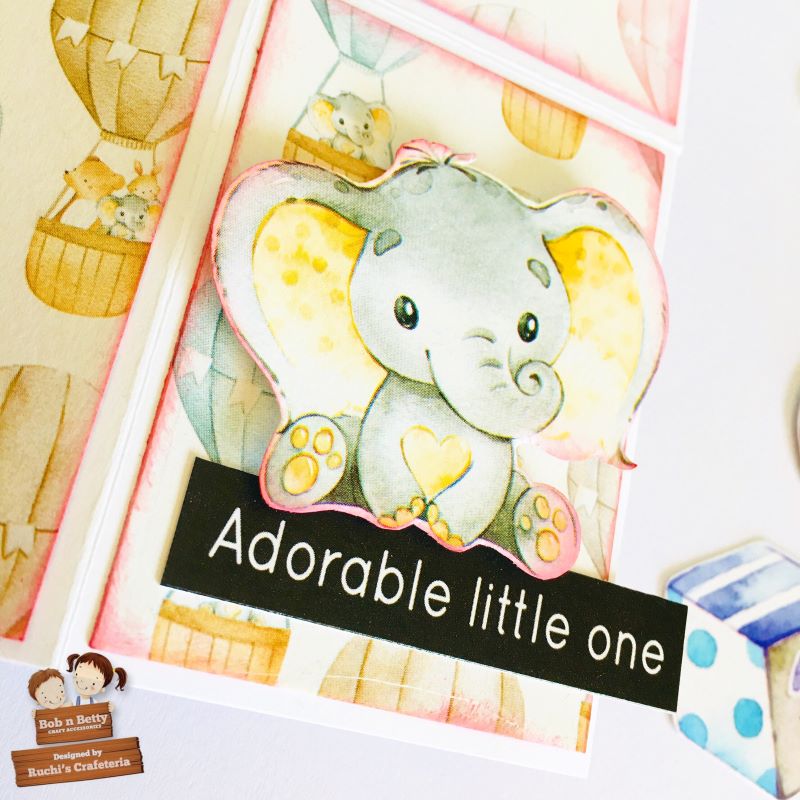
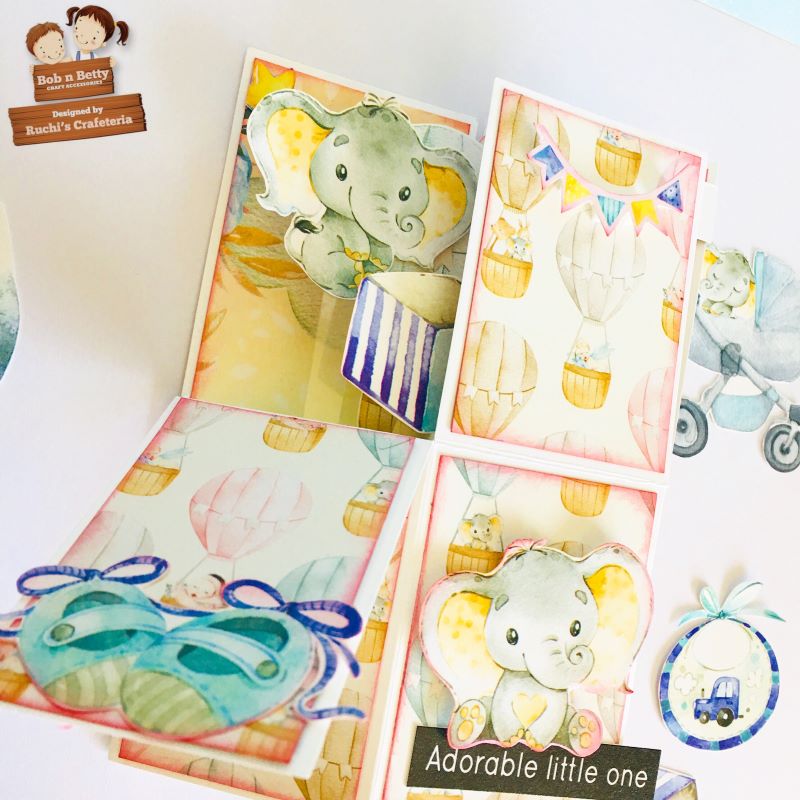
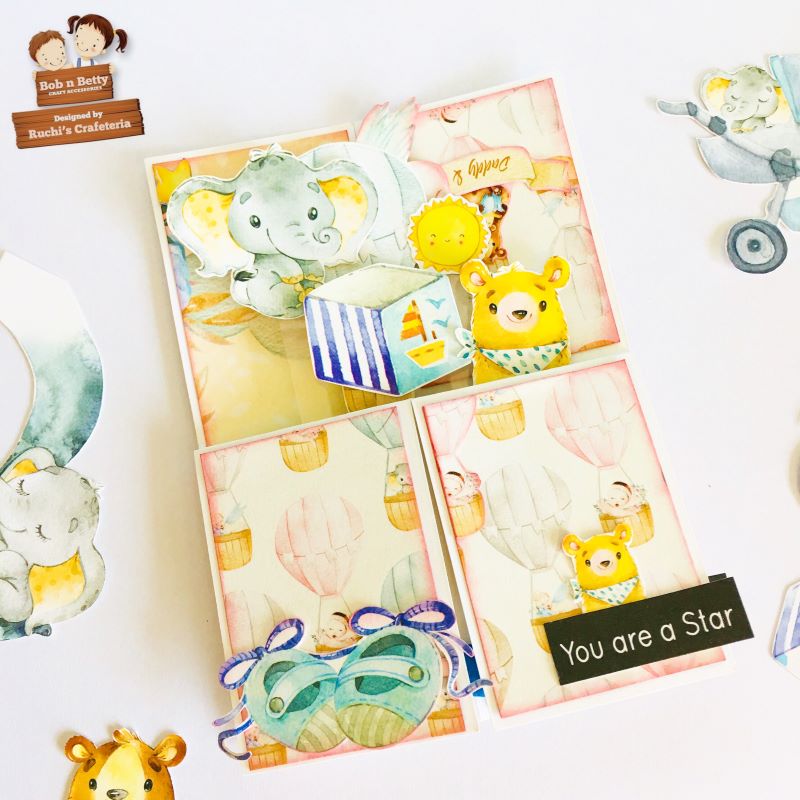
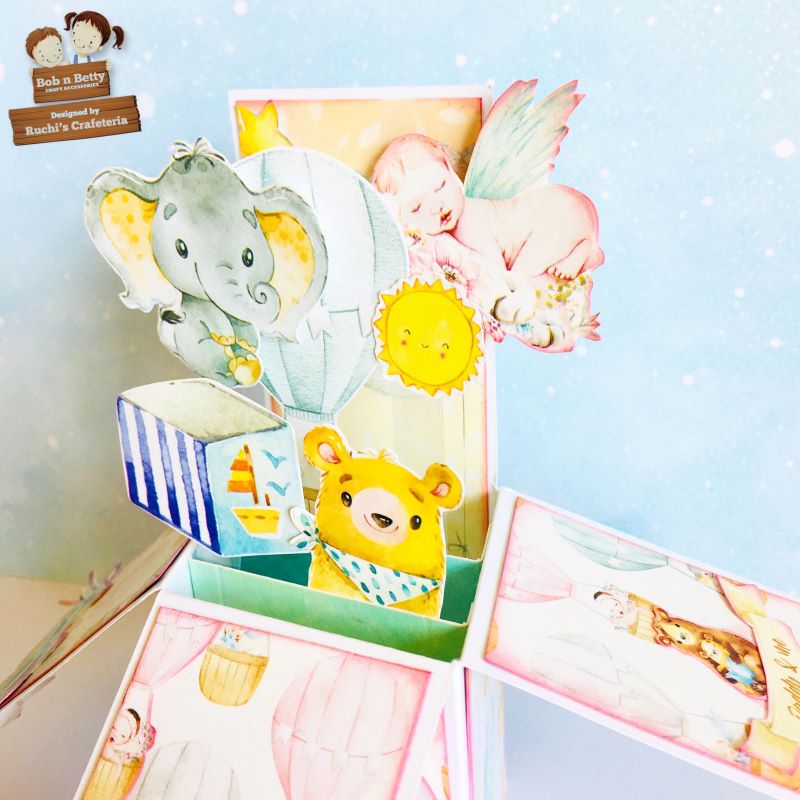
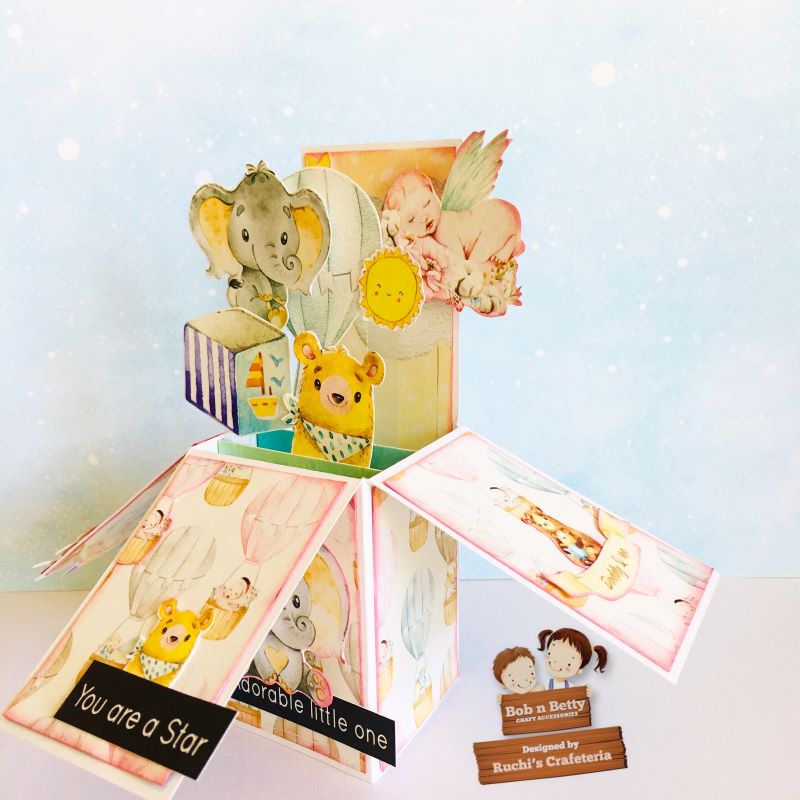
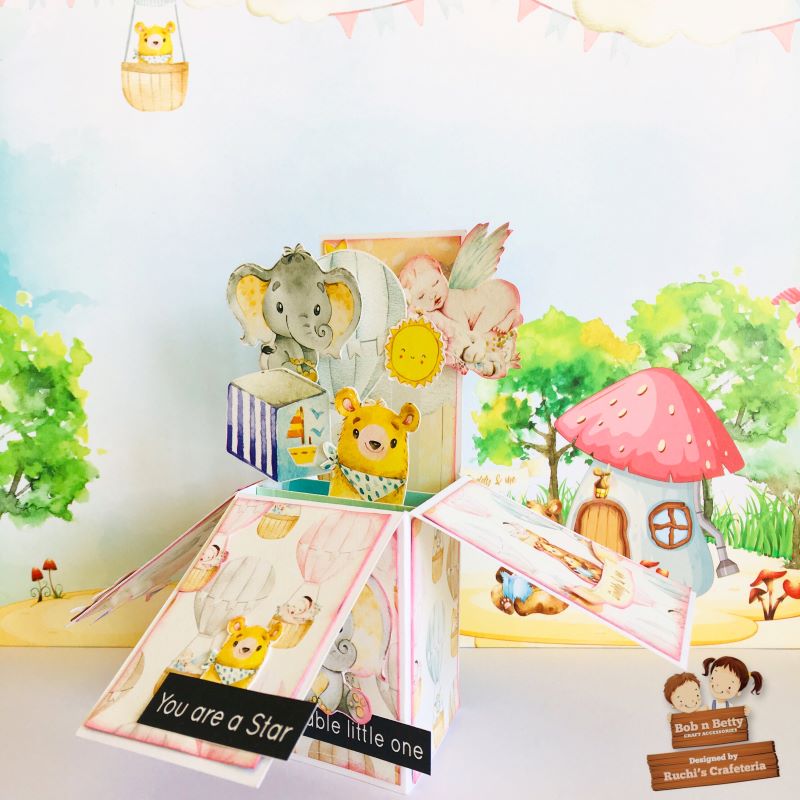
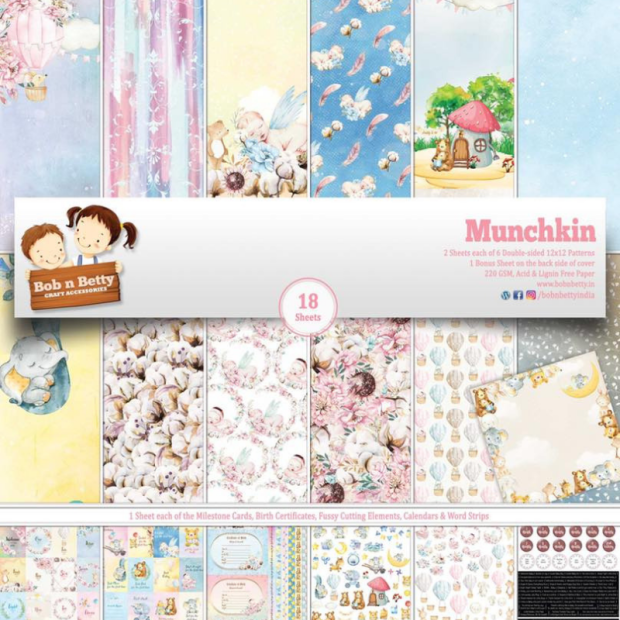
Hey there! Ruchi here from Ruchi’s Crafeteria and today I’m sharing a pop up box card ‘Adorable Little One’ which I’ve created using Bob n Betty’s new release ‘Munchkin’ scrapbook papers. Trust me.. These papers are just Fabulous!! Lovable!! Adorable!! Cute!! and perfect for your baby theme projects.
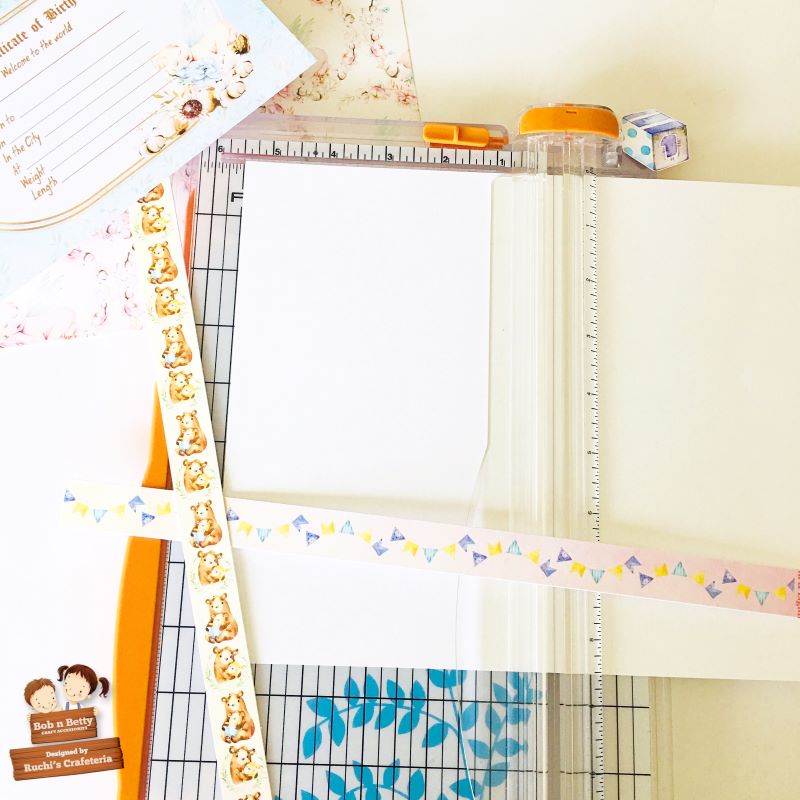
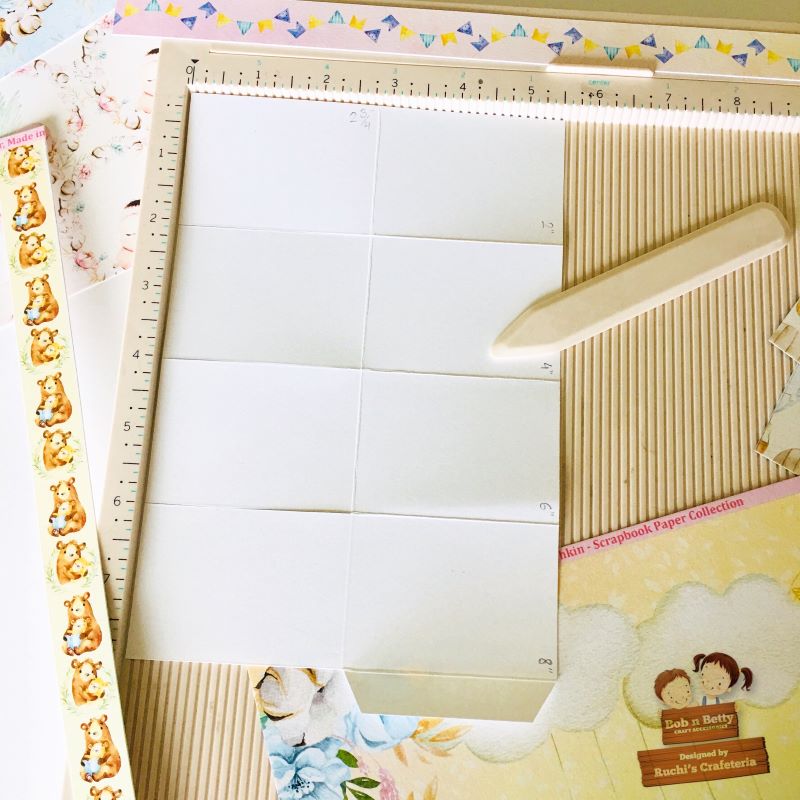
For this pop up box card, I picked a Neenah solar white cardstock measured 11″x8 1/2″.
Cut it in half and got 5 1/2″x8 1/2″ measured paper. So you can create 2 pop up box cards with one sheet of 11″x8 1/2″ cardstock.
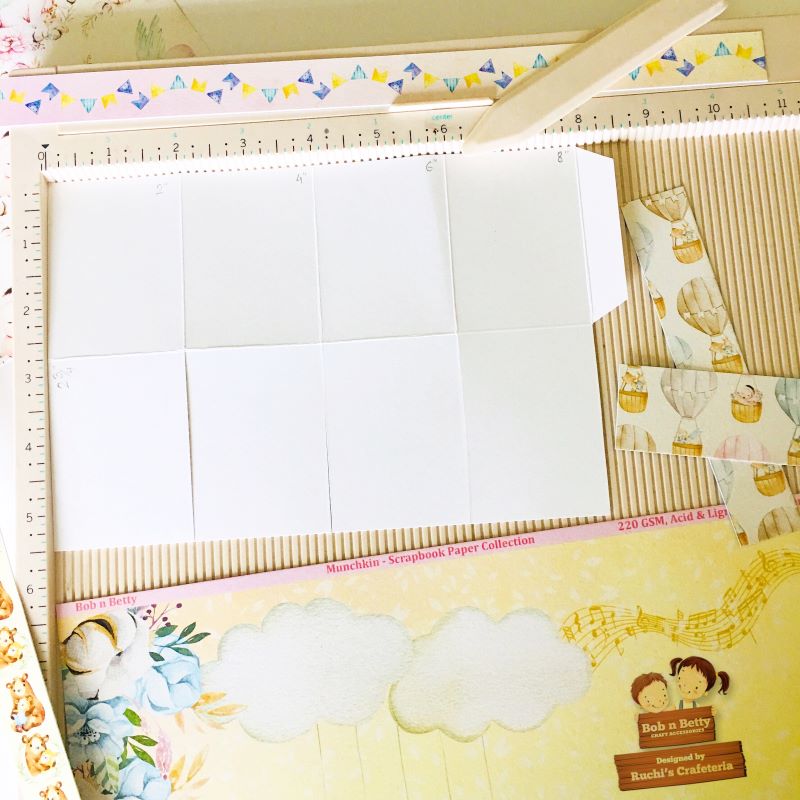
Scored it at 2″ 4″ 6″ & 8″ and then rotated the cardstock and scored at 2 3/4″
Don’t score in the middle of the flap which is just next to the 1/2″ flap. Cut the flaps as shown in the above pic and the last 1/2″ should be cut as shown. You have to put glue/ scoring tape at this 1/2″ flap to create a box shape.
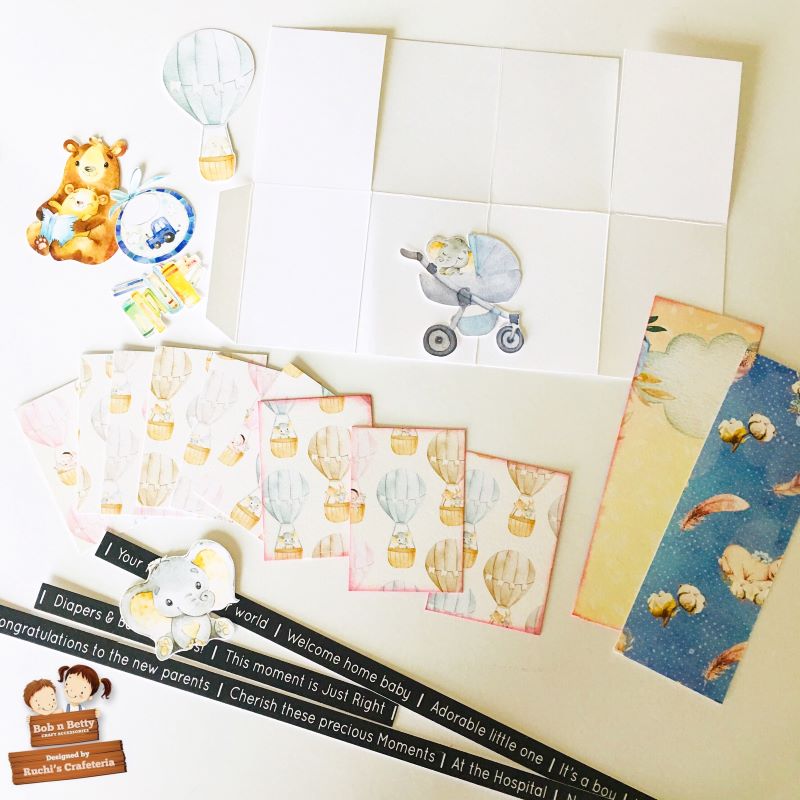
Before gluing… you need 9 pieces of pattern papers measure 2 1/2″x1 3/4″ and 2 pieces of 5 1/4″x1 3/4″
I’ve cut all the pieces using ‘Munchkin’ paper pack and distressed the edges using Worn Lipstick Distress ink.
Now you need inside strips to pop up your elements. I’ve created 2 stripes measured 3″x1″ and score 1/2″ both the sides.
Fussy cut some cute critters from Munchkin element sheets and cut some acetate strips for pooping the elements. Glued them on strips and glued some critters and baby elements to decorate my box card.
You can find one more project of mine using Bob n Betty- Munchkin paper pack HERE
Product used
I hope you like my today’s project. See ya next time.
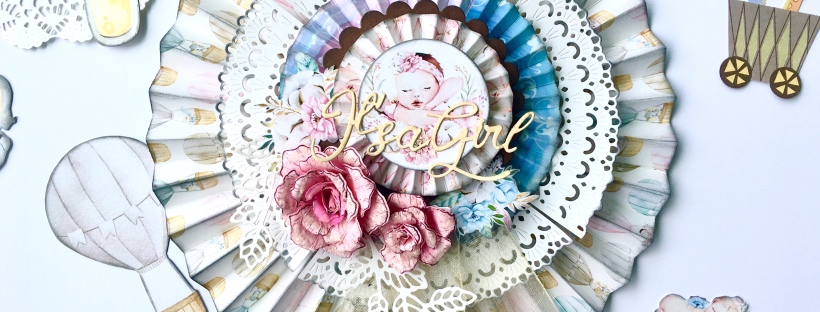
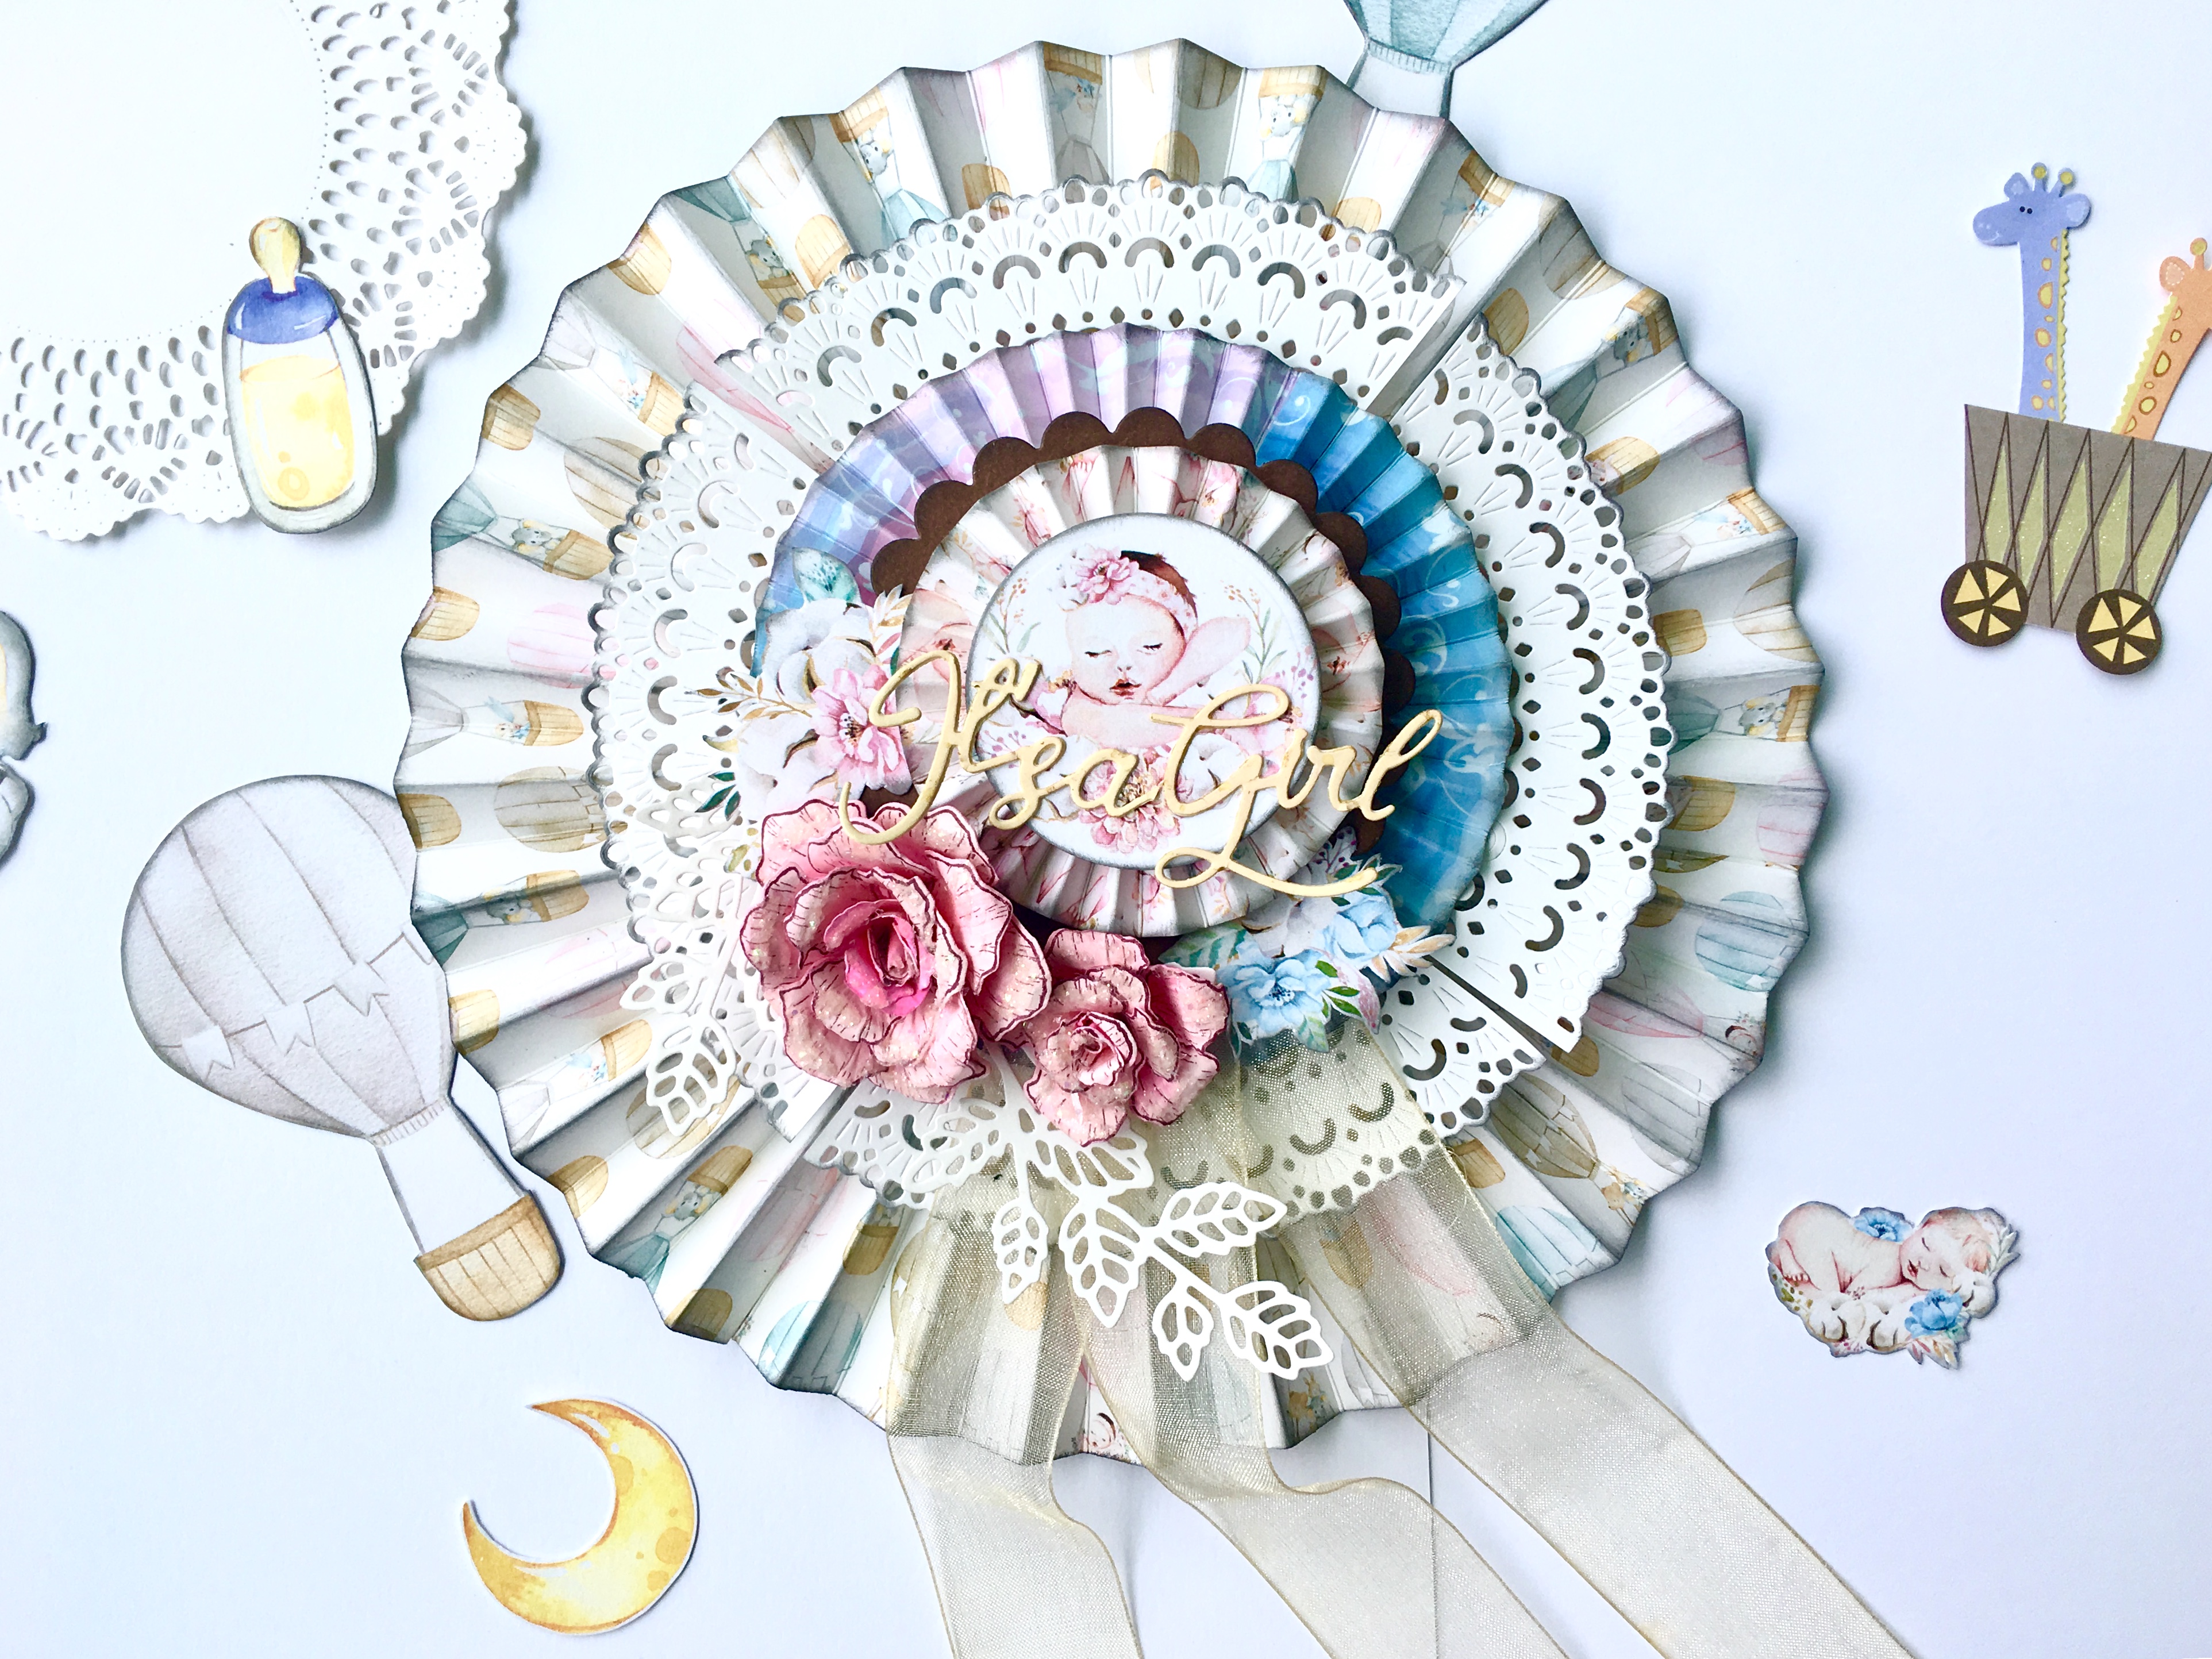
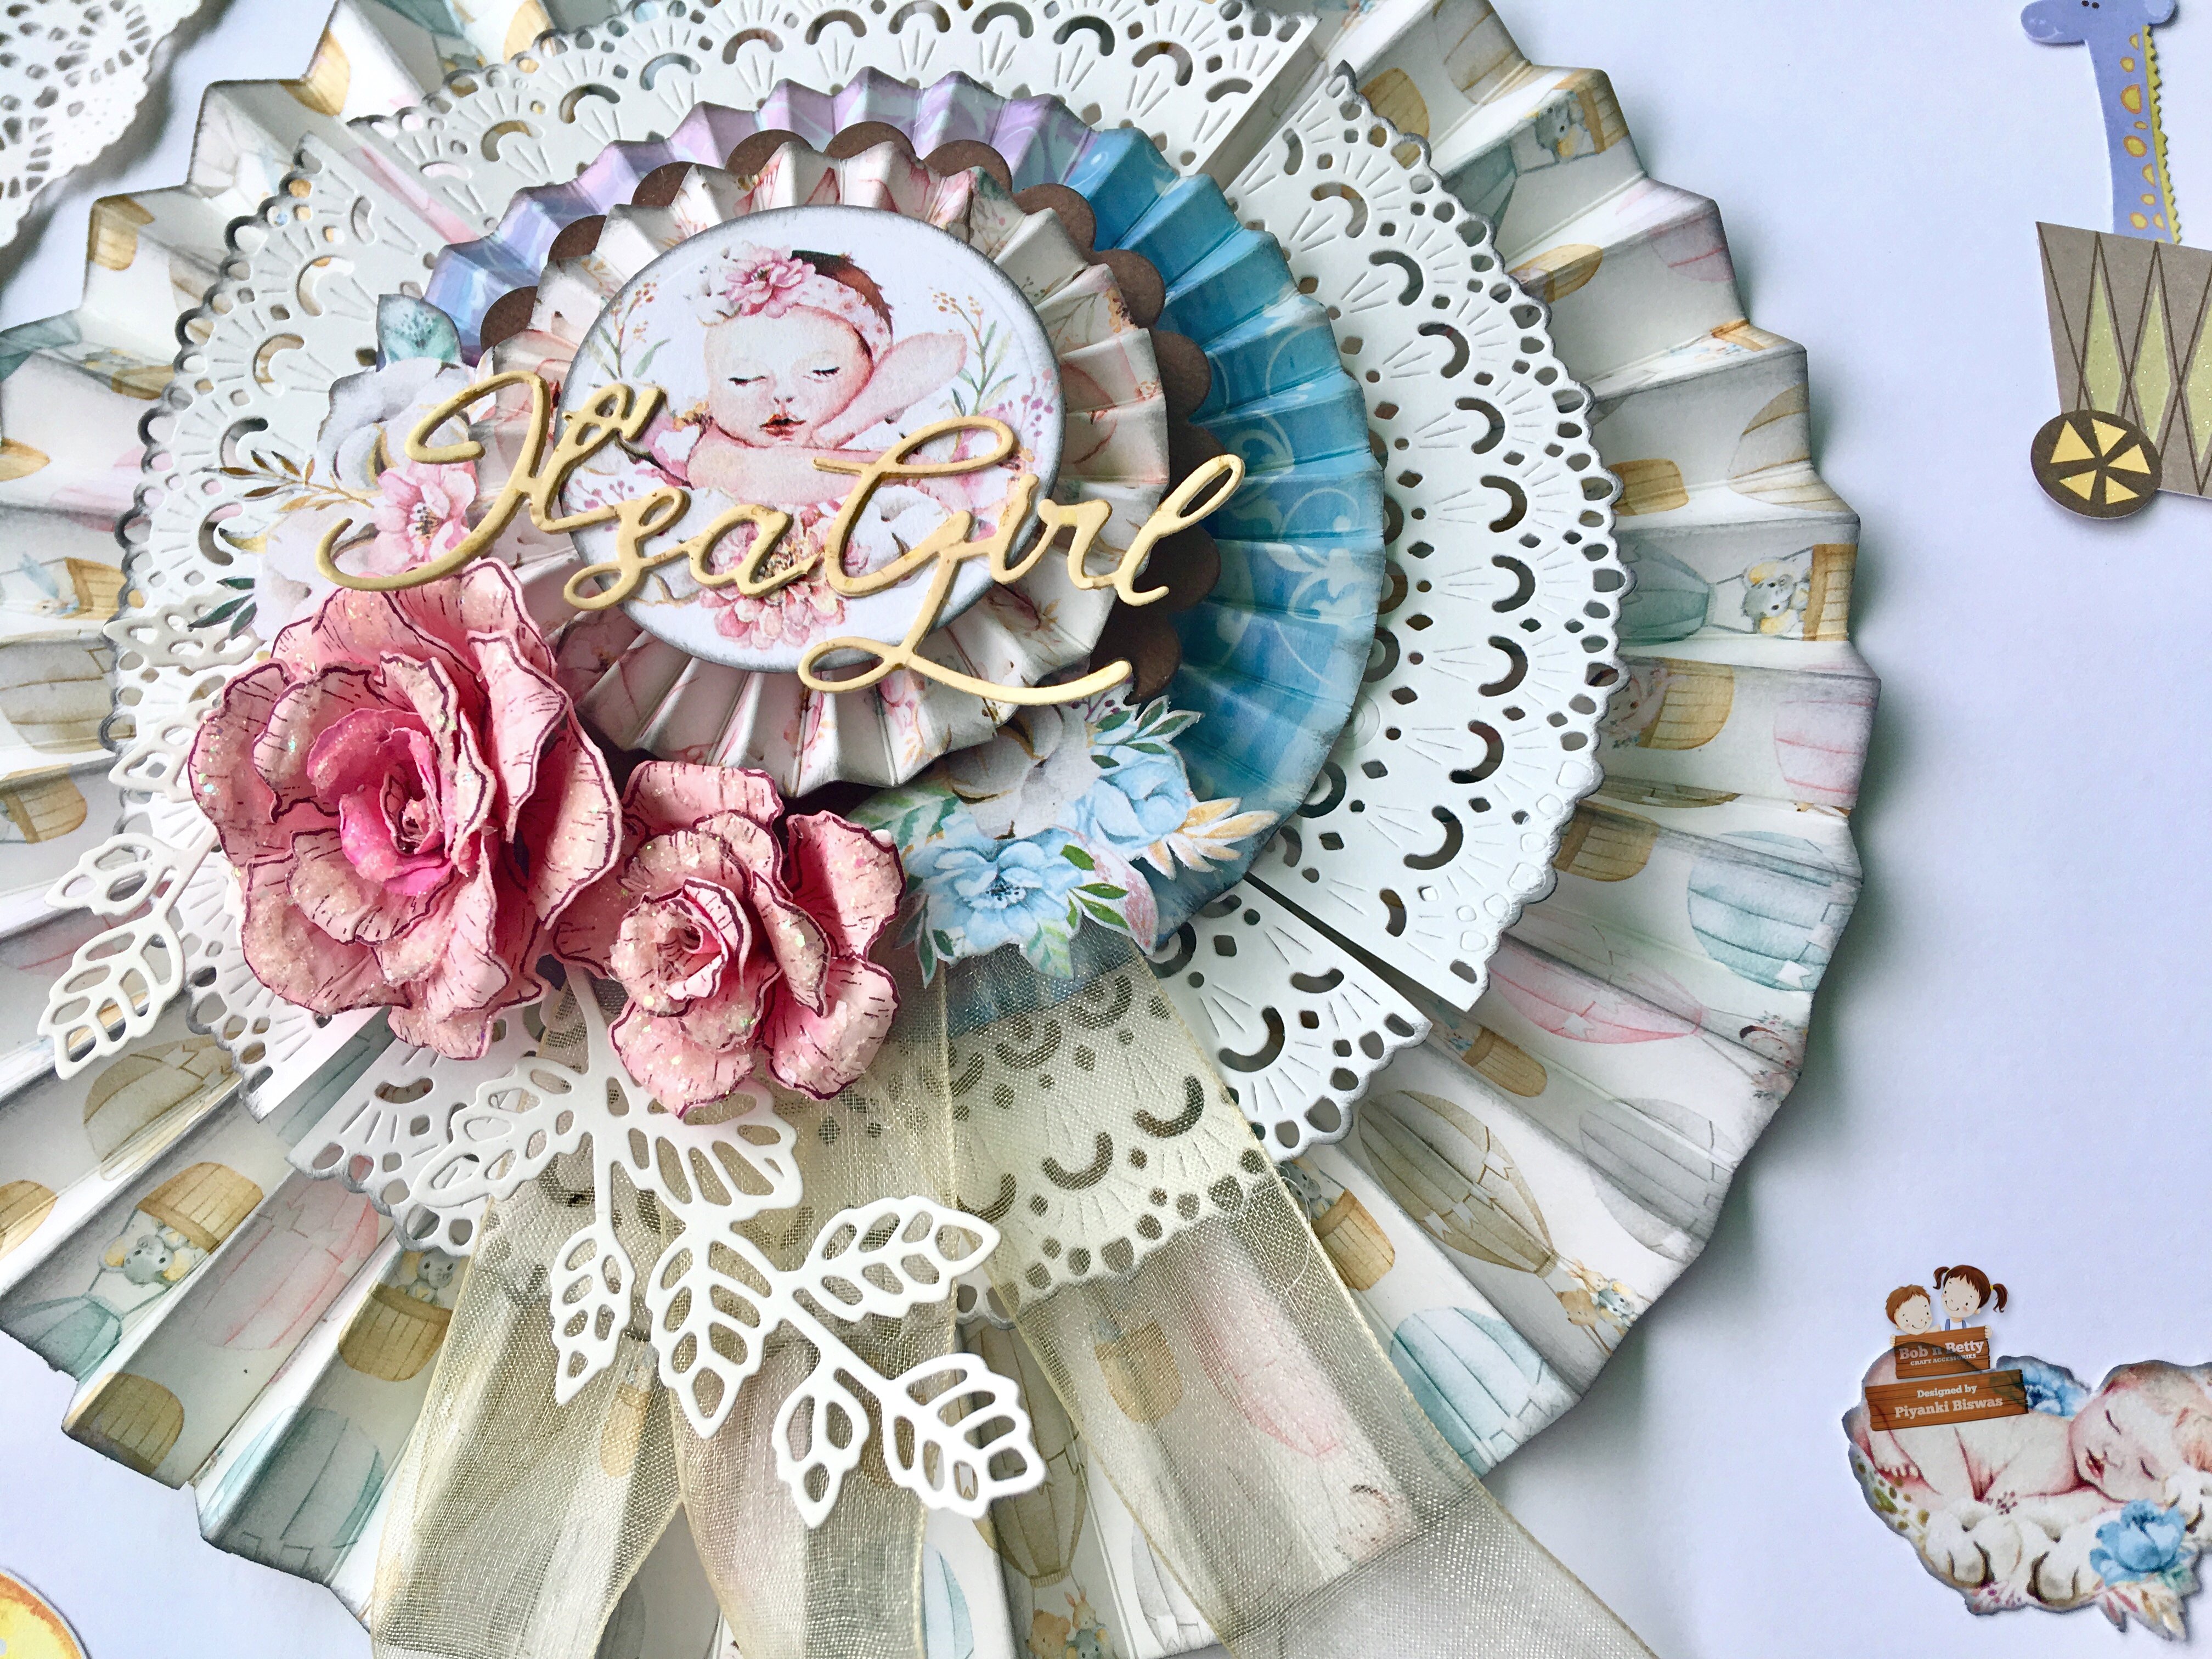
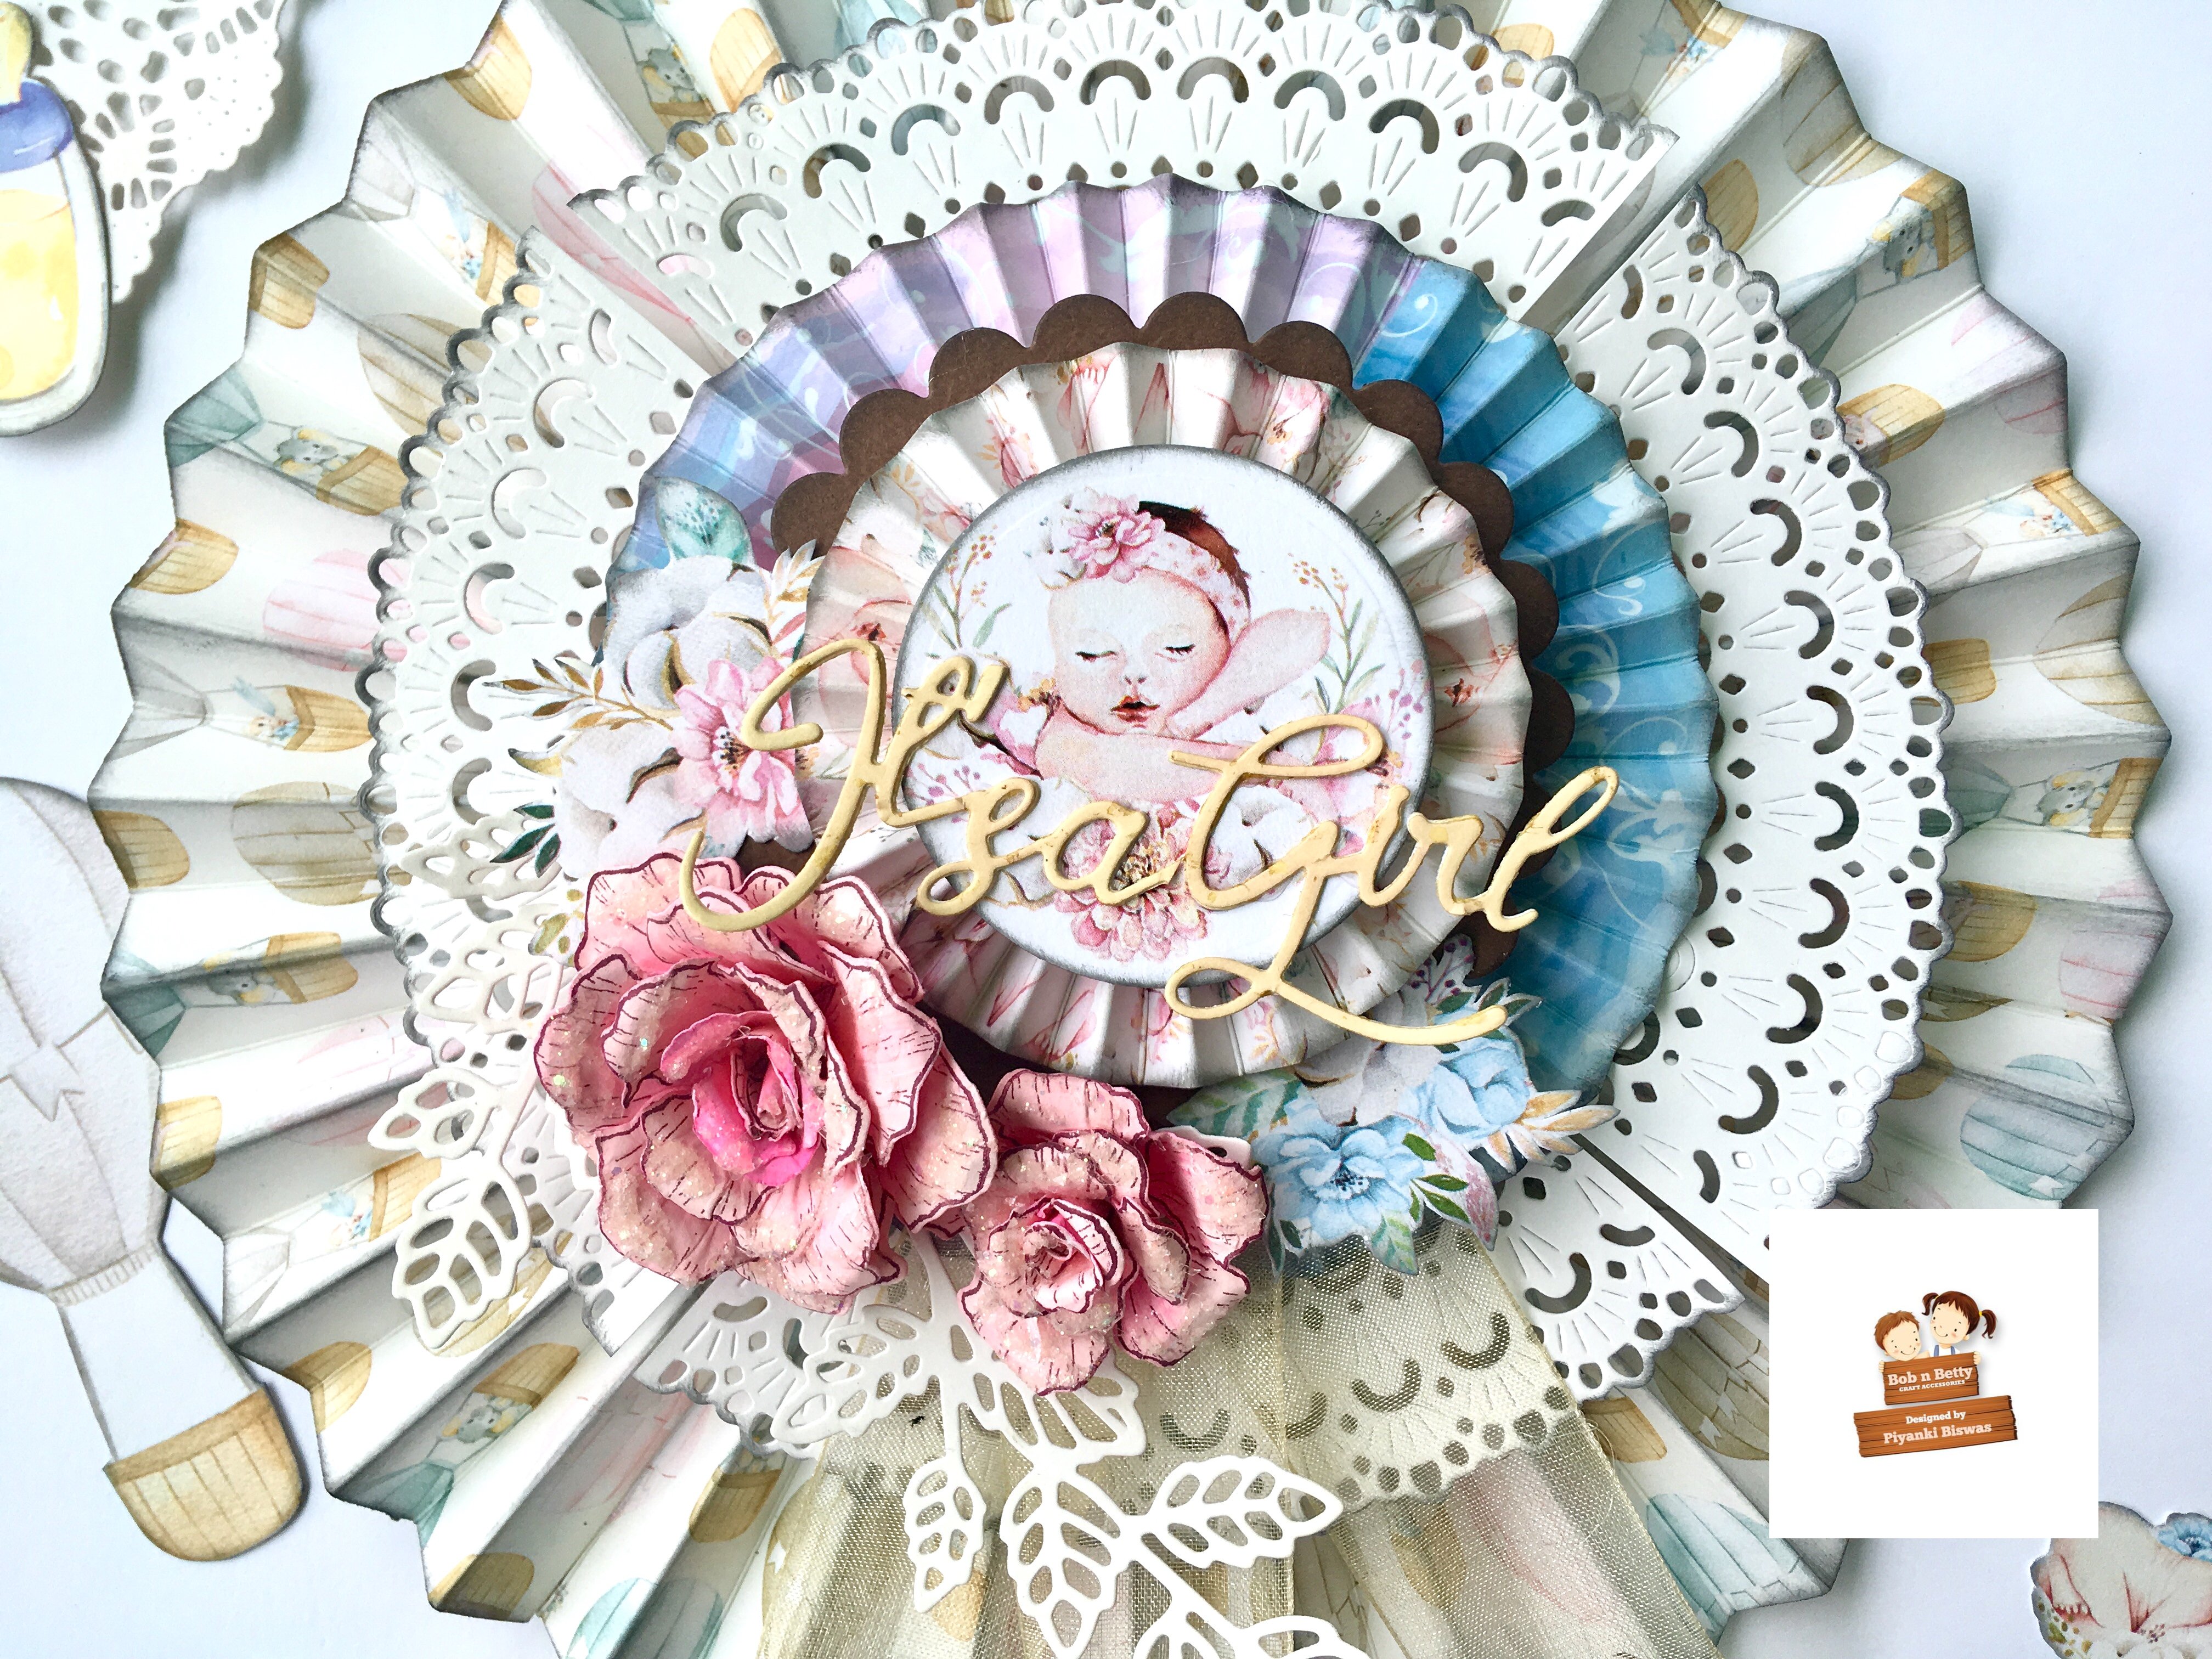
An almost mom prepping the house for baby and getting ready for all the before baby celebrations could definitely use a few wishes , decorations and frills. This rings bell what to and how to. Today’s post helps you to gather some ideas on how we can decorate with handmade rosette.
The paper collection helps you co ordinate multiple rosette so that you can create a 3D rosette. The largest is made from 6″x 24″ , the second measures 2.5″ x 18″ and the smallest measures 1.5″x 12″. To create many layers I have used die cut doilies , scallops and circle die cuts.
Do share your thoughts on this project and would love to see what you create with this paper pad.
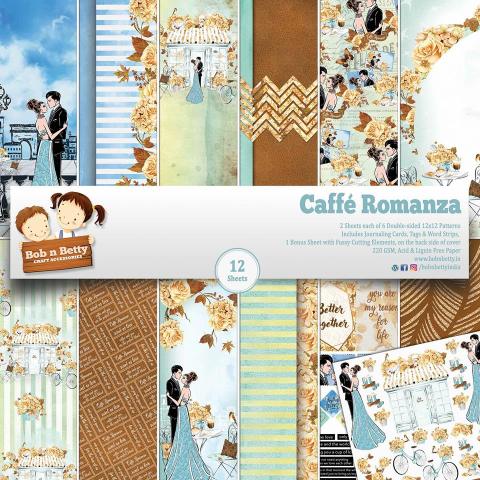
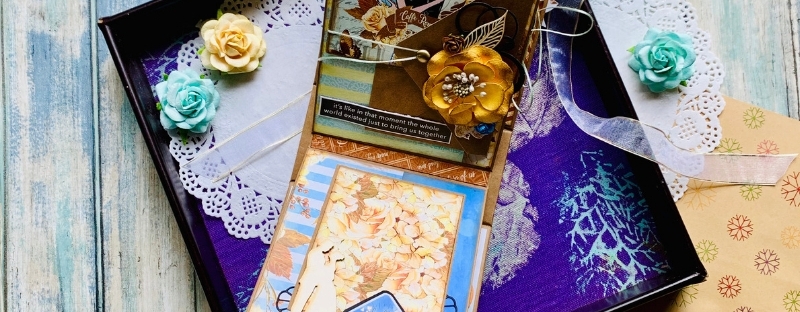
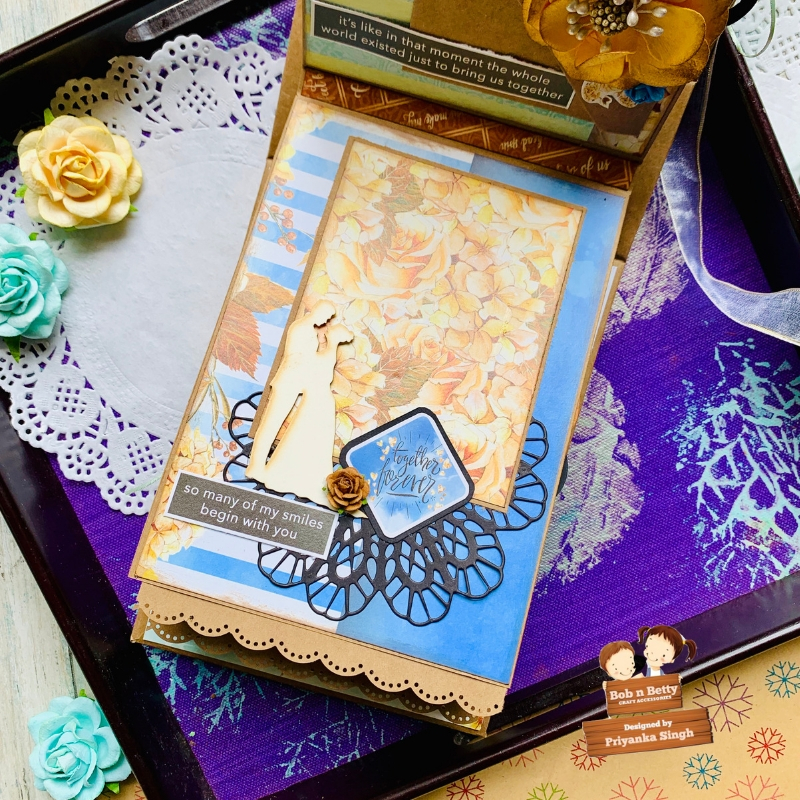
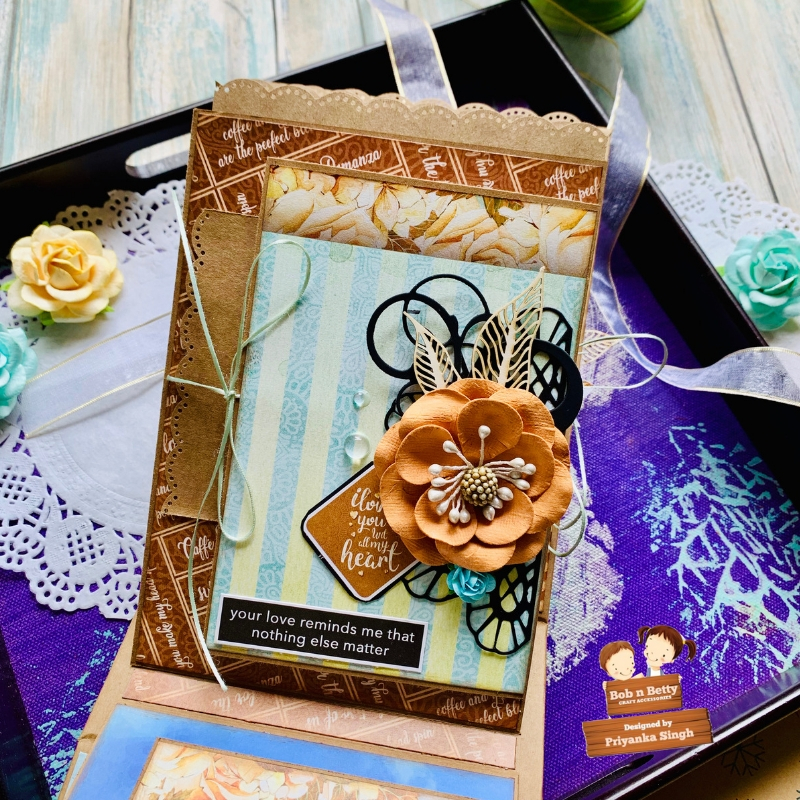
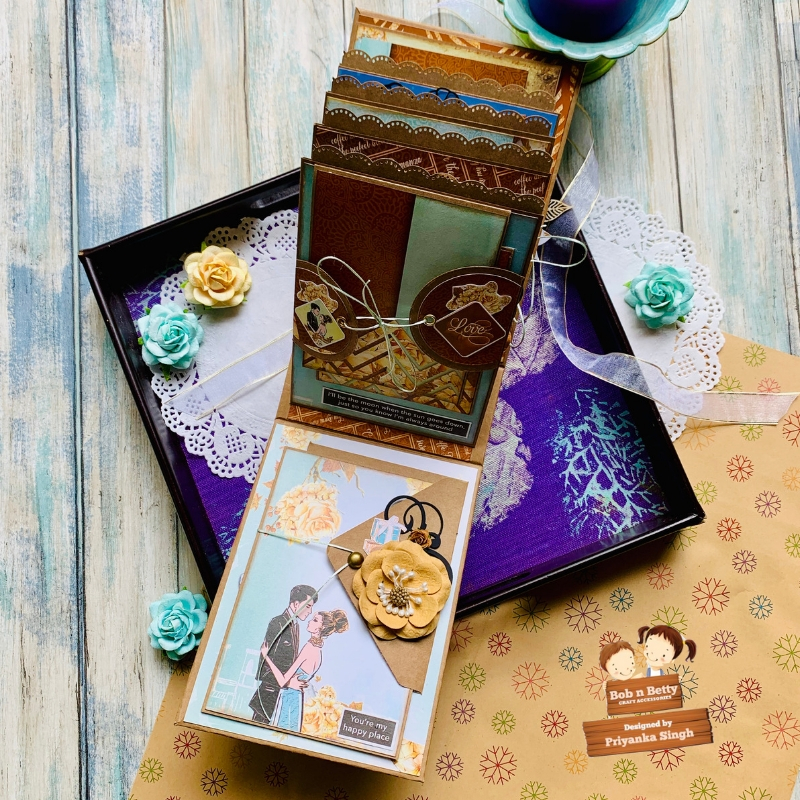
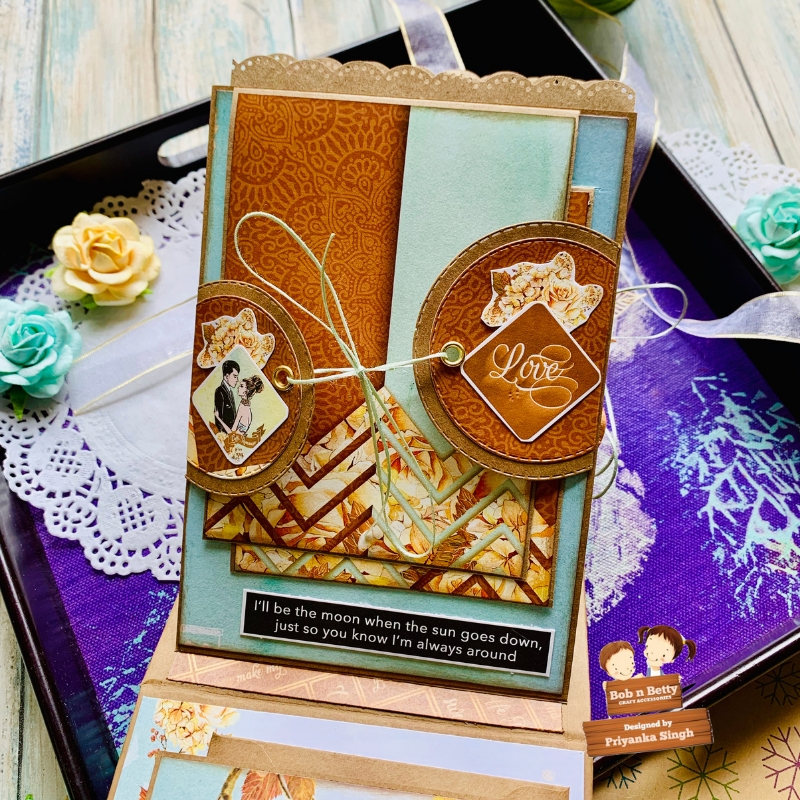
Priyanka this side from Prika-All About Crafts and I am here on the blog with another project of mine. Today I am serving you all an inspiration loaded with some fine cup of coffee and love themed mini album.
Here it goes…
I went ahead to design this cute mini album measuring 5*7 inches with cover size 5.5*7.5 inches. Since Caffe Romanza Paper collection is all about love and cafe…very unusual of what we do and find related to love themed collections…this is extraordinarily gorgeous collection to work with….
This is how the cover page goes with a ribbon closure on top..a couple in love and some floral around…
Let’s quickly dig into the inside pages, album holds total of four pocket pages with pockets, flips offering lot of room to add pictures…
Have gone ahead to add lot of fuzzy cut elements from the pack along with these gorgeous floral layouts on top of each pages….
Last page of the album holds flip over and envelope pocket to hold your journalling cards and photos….
Hope you liked my creation and would give it a try of making something different from usual love themed projects….do leave your love and comments for letting me know you loved it…
This is Ujjwal and I am so excited to share a new project with you today. I had this in mind ever since I got hold of the adorable Munchkin Collection and I am so happy to finally put it together and share it with you.
The paper collection is has elements for both baby boy as well as baby girl projects or you could even use them in gender neutral projects. I decided to go for a baby girl album.
The paper pack also comes with journaling cards, tags, words and fussy cutting elements, so you have everything to embellish and complete a project within the paper collection.
Sharing a few of my favorite pages from the book. Scroll down to see the video flip through.
I have a video flip through of the album along with lots of tips on creating interactive elements in a baby book. I hope you like this project.